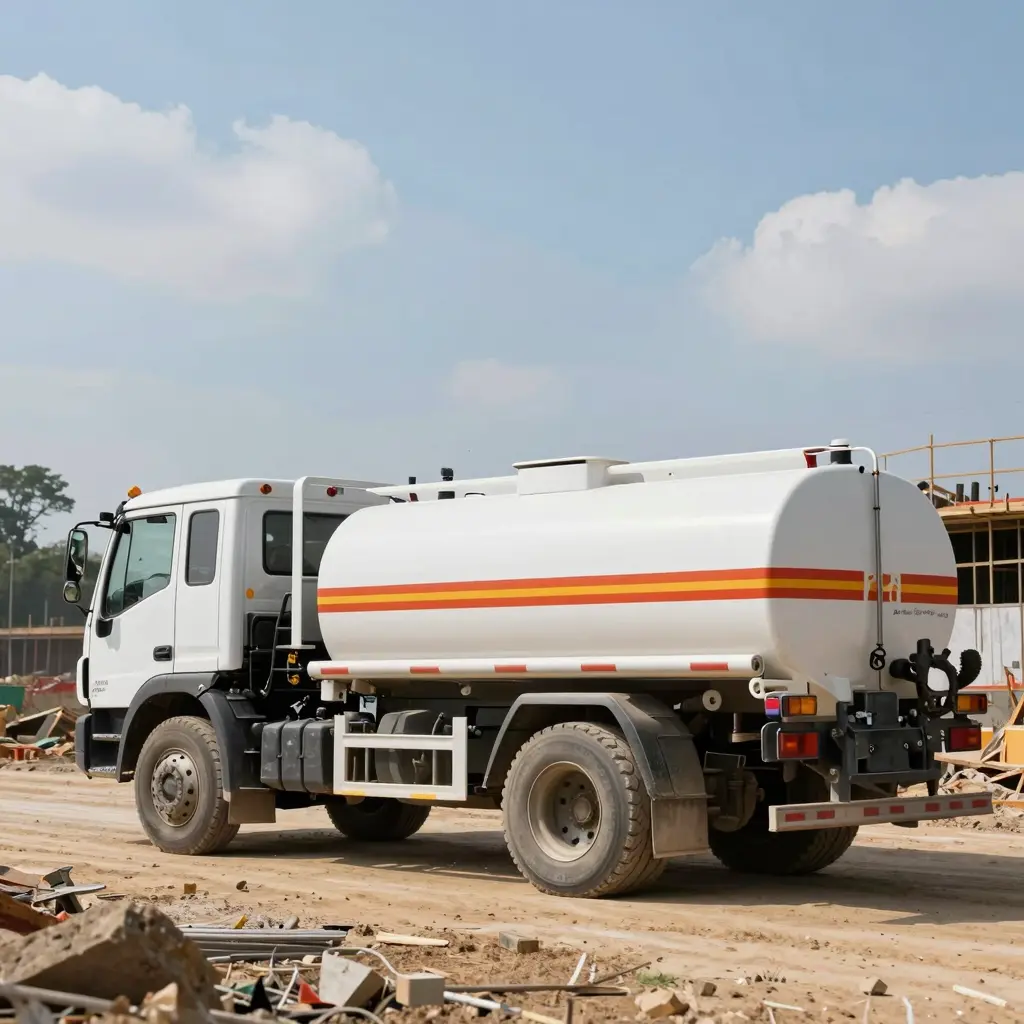

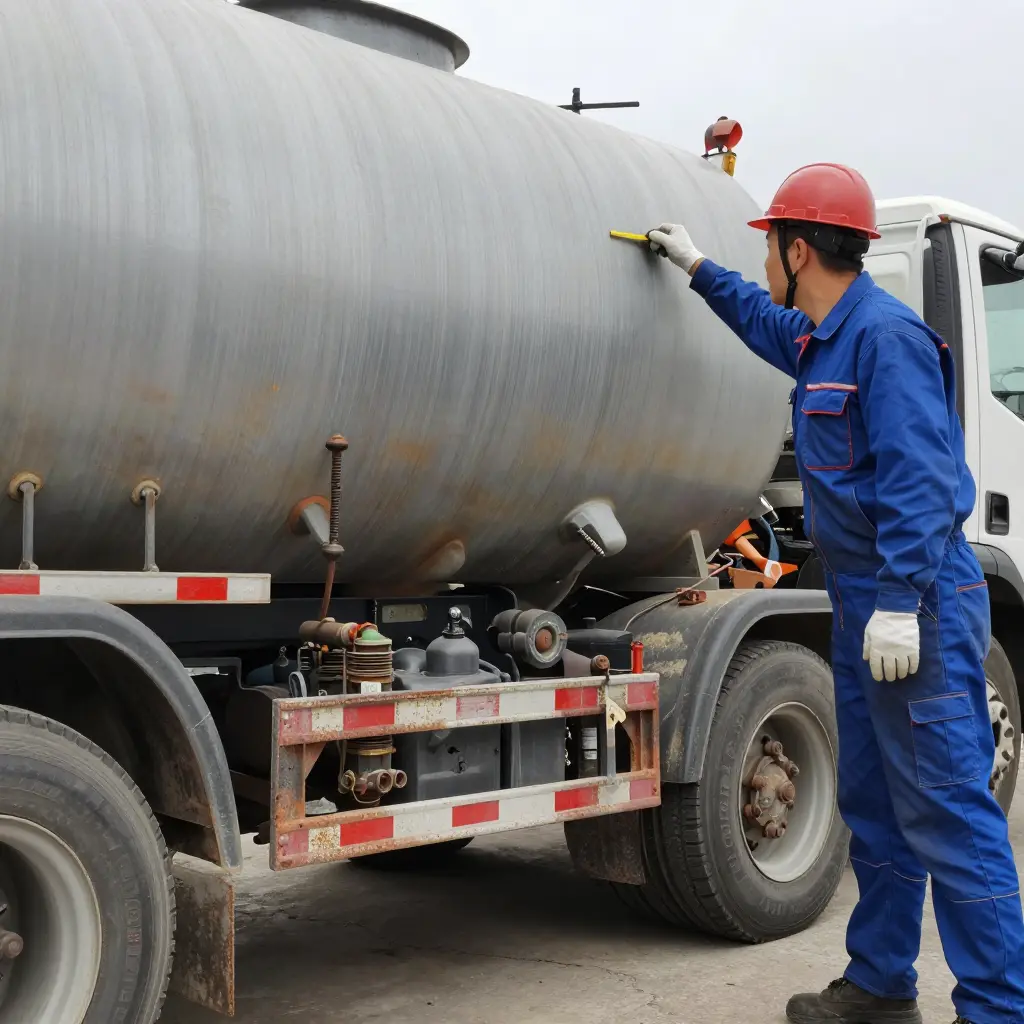
Buying a Septic Tank Truck in Maryland: What This Guide Delivers
You can take this guide out to the truck. It is a pre-payment inspection sequence for buying a septic tank truck in Maryland, laid out so a buyer, a mechanic, a fleet manager or a shop foreman can work through one specific unit before any money changes hands. Most of the repair money spent after a used vacuum truck is bought goes into two places: rusted chassis and leaking vacuum pump seals. Those two jobs get the most room here. Each step below says what to inspect, what a pass looks like in condition or in numbers, and which findings mean you should walk away.
Maryland adds a few things a generic used-truck checklist ignores. Salt on the I-95 corridor, humid summers in the Eastern Shore counties and the constant wet-and-dry cycle of hauling septage all speed up corrosion on frames, crossmembers, spring hangers and tank cradles. So chassis rust is treated here as a structural and financial measurement, not a cosmetic remark. Scale on a frame web or a perforated cradle rail moves the repair budget, and it moves what the truck is worth when you sell it. Pump seals get the same treatment. Shaft seals, vane wear, hose collapse and vacuum retention all get tested and recorded, because a pump that pulls weak on the day of sale will fail on the first full load. If you are comparing units across the state, current Maryland septic truck market listings show how asking prices track with tank size, pump type and chassis condition.
The five inspection layers covered
- Chassis and frame – rail corrosion, crossmember integrity, cradle mounting, spring and hanger condition.
- Vacuum pump and seals – seal leakage, vane and rotor wear, bearing play, hose and valve condition.
- Tank body and baffles – shell thickness, weld and patch history, baffle attachment, manway and gasket condition.
- Functional vacuum and pressure tests – pull-down time, vacuum retention with the pump off, discharge pressure, leak-down rate.
- Maryland title and compliance paperwork – title transfer, VIN and engine serial verification, tank certification, weight ratings and inspection records.
The audience is septic service owners, waste and environmental service contractors, fleet managers, independent buyers and operators, and the heavy-duty shops and mechanics who inspect these trucks for them.
Why Maryland Conditions Put Extra Stress on a Septic Tank Truck
Mileage is the least reliable number on a used septic truck in Maryland. These trucks age on two clocks at once: road miles, and hours spent parked with a pump pulling vacuum. Check the odometer and nothing else and you tend to overpay for a tired chassis and a pump that is further into its rebuild interval than the ad suggests.
The stressors stack, and they compound rather than simply adding up:
- Winter road salt and brine. Treated roads expose frame rails, crossmembers and mounting hardware to chlorides for months, and brine stays chemically active well below freezing.
- Year-round humidity and coastal air. Chesapeake Bay humidity keeps metal surfaces near the dew point, and salt-laden coastal moisture accelerates what plain humidity starts.
- Repeated wet-and-dry cycling from septage handling. Every load wets the tank interior, valves and hose connections, then leaves a residue film as it drains.
- High idle hours on PTO-driven pumps, plus stop-and-go rural duty. Pump run time piles up while the truck sits parked, and heavy-tank stop-and-go service adds suspension and frame fatigue that mileage never captures.
What Each Factor Does to the Metal
Brine is the worst of them for a tank truck chassis, because it wicks into places paint never reaches: lap seams, weld toes, the gap where a crossmember meets a rail. It stays wet long after the surface dries. Corrosion that starts inside a boxed channel works from the inside out, and stays invisible until the metal is noticeably thin.
Humidity and coastal air stretch that wet window across all four seasons. Condensation forms inside frame channels and on pump housings overnight, so parts that never touch a salted road still corrode.
Septage adds chemistry to the moisture problem. The liquid is mildly acidic and carries dissolved sulfides, so each wet-and-dry cycle concentrates corrosive residue at low points, interior welds and valve seats. Hoses and fittings stiffen and glaze instead of simply wearing thin.
Then there is the pump duty cycle, which runs on engine hours rather than miles. A PTO-driven pump can log thousands of hours of vacuum and heat while the chassis barely moves, so seals, vanes and lobes age at a rate the odometer cannot show. How those duty patterns shape component life in bulk liquid service is worth reading up on before you judge a truck; this overview of tank truck duty cycles is a reasonable place to start.
Stop-and-go rural routes finish the job. A full tank on a winding county road loads the frame, crossmembers and spring hangers with repeated torsional and braking force, and that finds weak or already-thinned steel quickly.
The Short Version
On a Maryland truck, inspect by duty signature rather than appearance. Ask for engine hours next to mileage, and ask what share of those hours ran at PTO speed. Probe rails and crossmembers with a pick at every seam and weld toe instead of trusting fresh undercoating.
Pump seal condition, hours-to-miles ratio and hidden frame corrosion are the three items that end deals. A truck that passes all three can work in this climate. One that fails any of them will cost more in the first year than the discount you negotiated.
Red Flags That Should Slow Down Any Maryland Purchase
- Rust perforation in the frame rails behind the cab – Push a screwdriver against the rail and the crossmembers just aft of the cab. If the tip breaks through, or the metal feels papery, you are pricing a frame section rather than a patch, and that number belongs in the negotiation before any deposit moves.
- Scaling on spring hangers and shackles – Look for flaking, layered rust where the leaf springs bolt to the frame. Years of winter brine on the I-95 corridor eat these parts from the inside, and worn hangers are both a shop bill and a likely DOT annual inspection failure.
- Bubbling paint on the tank cradle – Bubbles and lifting coating on the cradle saddles hide corrosion at the tank-to-frame contact points. Fixing it means lifting the tank, so get the quote before payment, not after.
- Oil weep at the pump shaft seal – A wet ring or a dirt-caked drip trail under the pump drive shaft means the seal is passing. This is why pump seal checks belong in the walkaround: a leaking seal usually means bearing wear and a rebuild, not a cheap part swap.
- Cracked or hardened vacuum hoses – Squeeze every hose on the suction side. Rubber that feels rock-hard, shows surface cracks or collapses flat in your hand will leak air and cost you vacuum on the first job.
- Missing baffle welds inside the tank – Shine a light through the manway and count the welds tying each baffle to the shell. Missing or skip-welded baffles let liquid surge, and they are a common sign of a tank built or repaired outside spec, which connects to how vacuum pump and tank baffle ratings mismatch.
- Gauges that will not hold pressure or vacuum – Cap the inlet, pull vacuum and watch the gauge. A needle that drifts or drops is either a bad gauge or a pump that cannot hold, and either one changes what the truck is worth.
- Mismatched tank and pump rating plates – Photograph both plates and compare CFM, tank capacity and pressure ratings. A mismatch means the truck was assembled from mixed parts, which complicates permitting, resale and your septic pumping truck inspection paperwork.
- No tank certification or hydrostatic test records – Ask for the certificate and the date of the last hydrostatic test. Without documented proof, some Maryland disposal sites and contract customers will question whether the tank is fit for regulated waste hauling.
- Fresh undercoating sprayed over pitted metal – Run a magnet and a scraper along the frame. Soft, waxy coating over rough texture is often a cover-up applied the week before the listing went live.
- Title, VIN and lien irregularities – Match the frame VIN stamp, the door jamb tag and the title, then check for a recorded lien. An unreleased lien means you cannot register or plate the truck in Maryland.
- Expired annual inspection sticker or missing USDOT markings – A stale sticker or absent DOT number points to a truck that sat unmaintained, and you inherit every deficiency the shop finds on day one.
Treat the list as a screening tool. It tells you when to slow down and ask harder questions, not whether to sign; the full sequence comes later.
Chassis Rust Grading: What Each Level Means Before You Pay
| Rust Grade | Typical Locations | Surface Condition | Structural Risk | Recommended Action | Expected Repair Cost Band (indicative, Maryland shops) |
|---|---|---|---|---|---|
| Grade 1: light surface oxidation | Frame rails, crossmembers, cradle contact points | Thin orange film, no metal loss | None | Clean, treat, apply protective coating | $100 – $350 |
| Grade 2: surface rust, metal intact | Rails, outriggers, hanger brackets, under-tank areas | Rust scale on surface, sound metal under scraping | Low | Wire-brush or blast, rust converter, recoat, recheck in 12 months | $300 – $1,200 |
| Grade 3: pitting and flaking on rails or crossmembers | Frame rails, crossmembers, gussets, weld seams | Flaking scale, pitting to roughly 1/16 in | Moderate | Needle-scale, measure remaining thickness, weld repair, monitor yearly | $1,200 – $4,500 |
| Grade 4: perforation or delamination at spring hangers and tank cradle mounts | Spring hangers, cradle mounts, shock brackets, rear frame | Holes, layered steel, cracked welds | High | Renegotiate price or walk away, structural welding plus reinforcement | $4,500 – $12,000 |
| Grade 5: structural section loss requiring frame repair or rejection | Main frame rails, hanger-to-frame and cradle-to-frame joints | Missing section, full-thickness loss, visible frame sag | Critical, not roadworthy | Reject the unit or fund a full frame repair, keep out of service | $12,000 – $30,000+, or reject |
Cost figures are indicative ranges quoted by Maryland heavy-truck shops, and they move with shop rates and parts. Confirm chassis rust on a septic tank truck with a hands-on thickness check before you pay.
Chassis Rust: Where It Hides and How to Measure It
Nobody photographs the frame
Chassis rust on a used vacuum truck almost never shows up in listing photos. Sellers photograph the tank, the pump, the hose reel, the cab. Nobody photographs the inside of a C-channel. The frame also happens to be the one major component that cannot be economically replaced once it has gone bad.
A septic truck’s frame lives harder than a dry freight chassis. Every load cycle flexes the rails. Every drip at the discharge valve, every splash over the hatch, every winter mile through road salt leaves a film of septage and brine in exactly the spots a pressure washer cannot reach. Hydrogen sulfide and organic acids do slow, patient work inside boxed sections where moisture never dries out.
A frame rail inspection is worth more of your time than the pump seal check, and a truck that photographs beautifully can still be one you walk away from. Below, the frame gets worked in sequence, and then a hammer and a gauge get turned into evidence.
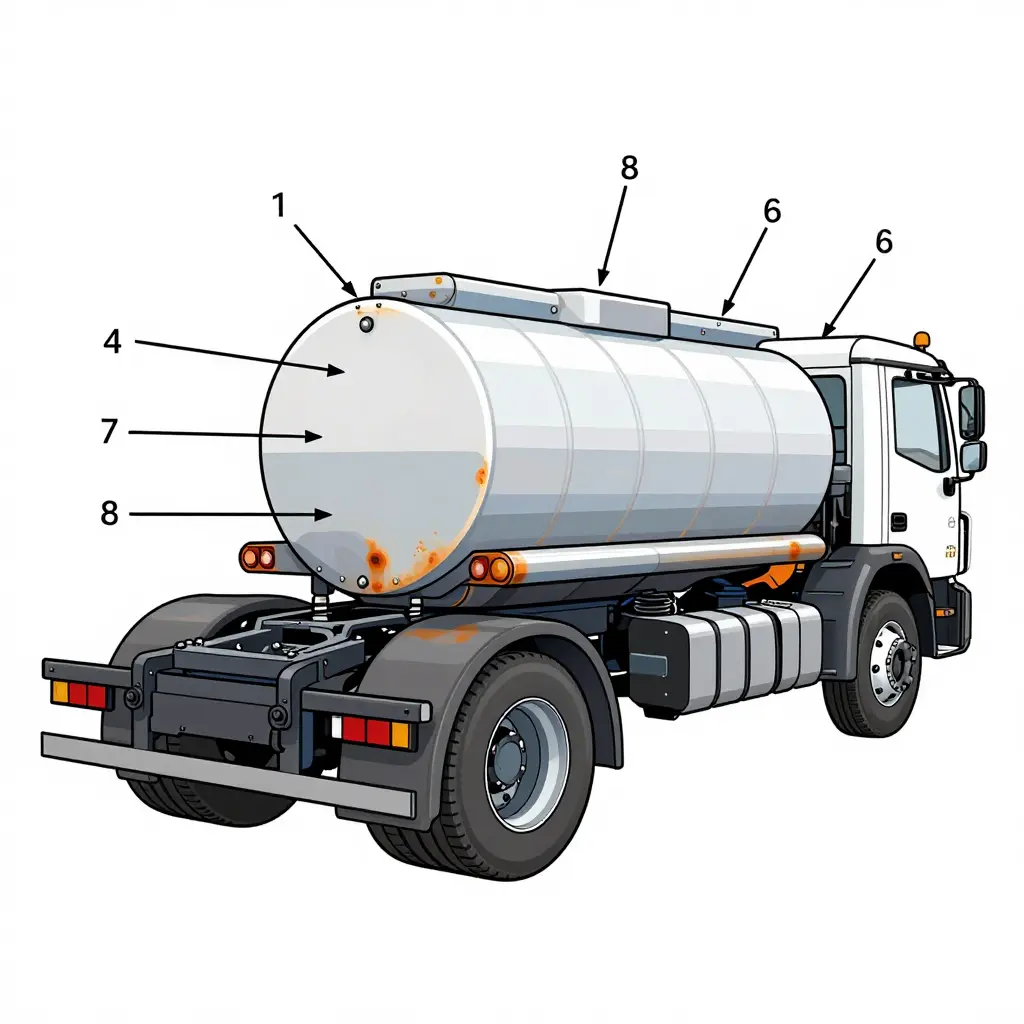
The six highest-risk rust locations
If time is short, spend it here. These are the spots where section loss hides and where a failure actually matters:
- Inner C-channel faces and the top flange tucked behind the tank cradle
- Crossmember ends where they tie into the rail web
- Riveted gussets and bracket-to-rail joints where pack rust can force plates apart
- Rear spring hangers and shackle brackets, especially the outboard faces
- Tank cradle saddle mounts and the rail crown directly beneath each saddle
- Rear bumper, valve mounting plates, cab mounts and the splash zone behind the cab
Working the frame, station by station
Frame rails and inner C-channel faces
Start at the front bumper and work rearward along one rail, then come back on the other. The outer web is the easy half. The inner face, the one facing the tank, fuel tank and exhaust, is where condensate and septage film sit. A mirror, a bright light and a phone camera on a stick will get you a look at it.
Crossmembers
Crossmembers rot from the ends inward, where the bracket traps dirt. Check the top surface under the tank belly for a dirt berm that stays damp after rain.
Gussets and riveted joints
Watch for rust bleeding out from under rivet heads and a brown coffee-stain trail below the joint. Flaking layers pushing two plates apart is pack rust, and pack rust is a structural finding rather than a cosmetic one.
Spring hangers and shackle brackets
These carry load through a handful of bolts and a thin bracket wall. Cracks chase thinned metal, so any thinning here is serious. Check both sides of each bracket and the hanger pin boss.
Tank cradle and saddle mounts
The saddle holds a wet, acidic tank against the rail crown. Water wicks under the saddle pad and never evaporates. On a used septic tank truck in Maryland this is the most predictable rot zone on the whole vehicle.
Rear bumper and valve mounting plates
Valve spills land here every day. Thick plate can lose a surprising amount of section before it looks thin.
Cab mounts
Outriggers and mount brackets collect spray off the steer tire. A soft cab mount shows up as a shifting cab and a wandering steering wheel, long after the rust started.
Behind the cab: the splash zone
Septage splash and road spray converge on the frame just behind the cab and on the tank head sheet above it. Check the wiring loom and air lines in that pocket as well. Corrosion there causes electrical faults that get misdiagnosed as pump problems for months.
Surface oxidation versus structural scaling
Surface rust is uniform, reddish-brown, a mil or two thick, and it wipes back to sound metal under a wire brush. Scaling is layered, dark brown to black, flakes off in laminate chips, feathers the edges of the section and leaves pitting behind.
Hammer tap and ultrasonic thickness gauge
Use a 1-2 lb ball-peen or chipping hammer and strike perpendicular to the steel in a grid along each rail. A sound section rings. A delaminated or scaled section gives a flat, dead thud. Compare left to right, because asymmetry is the giveaway. Never strike a brake line, fuel line or the tank shell.
Then measure. A dual-element ultrasonic gauge (2-5 MHz) with coupling gel reads through paint and works better than a single-crystal probe on pitted surfaces. Calibrate on a known block, then take readings every 150-300 mm plus a dense cluster at every joint, hanger and saddle. Record the lowest reading in each square foot rather than the average, because corrosion fails locally.
What reading is acceptable?
Compare each number against the original frame section thickness for that chassis, which you can get from the OEM build sheet or a dealer specification lookup. Do not judge against the truck parked next to it.
| Frame element | Typical nominal thickness | Plan repair / negotiate | Walk away |
|---|---|---|---|
| Rail web | 0.25-0.31 in (6.4-8.0 mm) | 10-15% loss | over 20-25% loss |
| Rail flange | 0.31-0.38 in (8.0-9.5 mm) | any pitting at flange edge | 15%+ loss or perforation |
| Crossmember | 0.19-0.25 in (4.8-6.4 mm) | 10% loss | cracked or holed end |
| Hanger / gusset bracket | 0.25-0.31 in (6.4-8.0 mm) | thinning with surface crack | any through-wall loss |
Field practice in most shops: a 10% loss is documented, 15% is negotiated, 25% is a refusal. Anything that fails within 300 mm of a hanger, crossmember or cab mount is a refusal regardless of the average.
Why fresh black paint is a warning, not a selling point
Heavy undercoating and glossy black chassis paint are the two cheapest ways to hide a rust problem before a listing photo. Rubberized coating traps moisture against the steel and buries the flaking that would tell you the truth. Fresh paint over a wire-brushed rail is a cosmetic repair, not a structural one, and it usually shows up on frames with something to conceal.
Ask when the coating went on and what was under it. Tap coated areas; a dead thud under soft coating is a bad sign. Where the seller cannot answer, deduct for what you cannot see, then work out what deferred structural repair really costs in downtime, lost routes and resale value.
The pass standard
Chassis rust is a measurement problem. Walk the six stations in order, tap a grid, gauge the low points and compare every number to the original section thickness. A truck with honest surface oxidation and full-thickness rails is the better buy over a glossy one whose saddles are half gone. If the seller will not let a gauge and a mirror near the frame, that refusal is your inspection result.
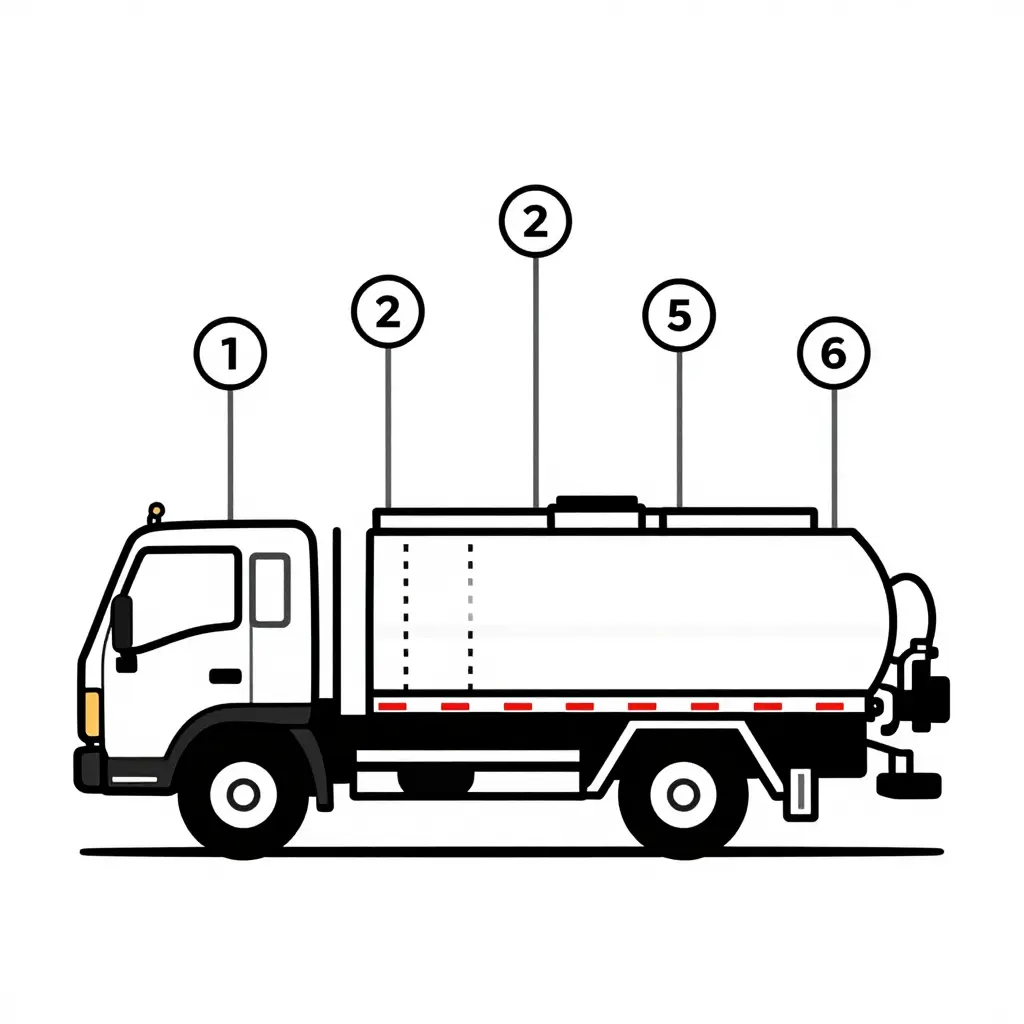
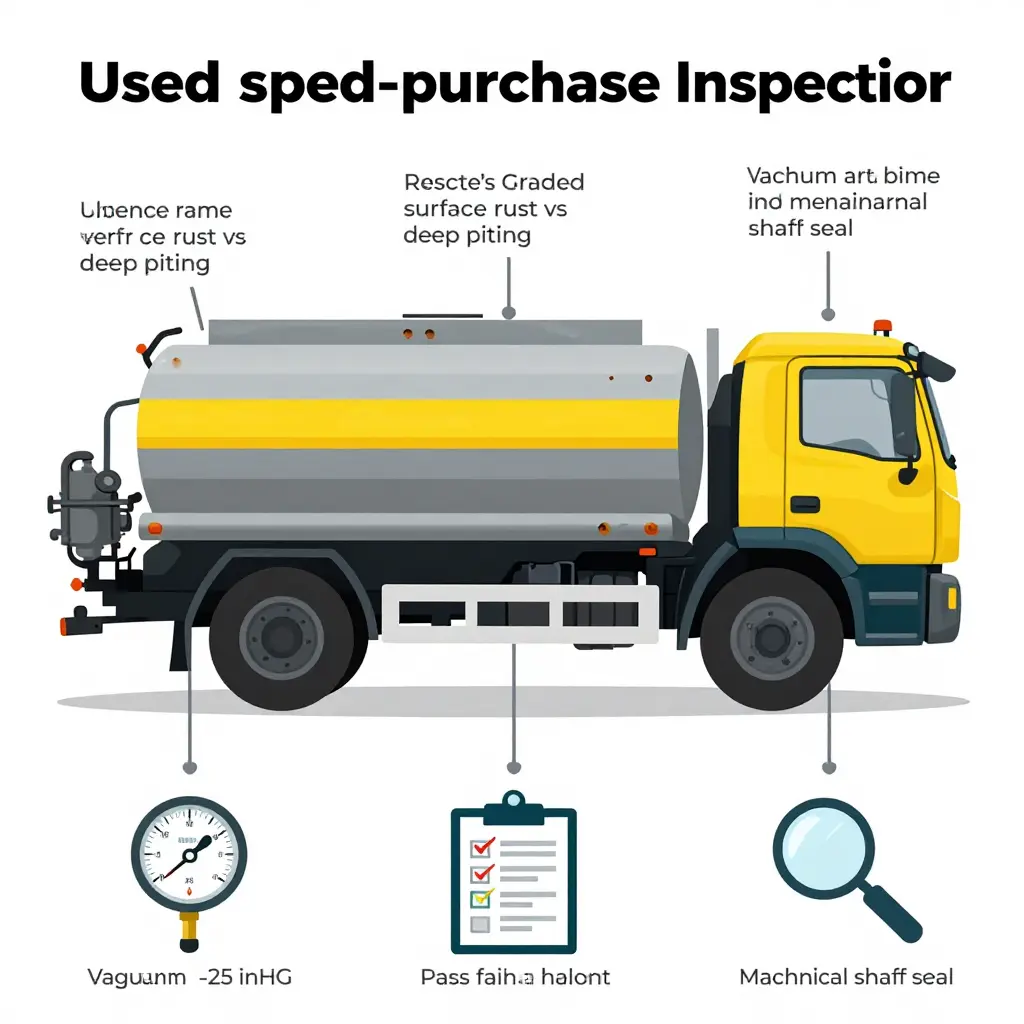
Figure 1. Six numbered zones to walk in sequence during a septic pumping truck inspection, from chassis frame and crossmembers through the rear valve and hose connections.
Vacuum Pump Seals: Whether the Truck Can Work Tomorrow
Seals decide the first week
A pump can pull hard on the lot and still quit on the first job. Seals are usually the reason. They are the cheapest parts inside a truck-mounted septic tank truck vacuum pump and the ones that decide whether the unit earns tomorrow or sits behind the shop. Every vacuum pump seal is a boundary: vacuum on one side, oil or atmosphere on the other. When that boundary softens, the pump does not fail all at once. It loses authority cycle by cycle, until a driver stands over a full tank waiting for suction that never comes.
Pump seal checks belong in a pre-purchase inspection next to chassis rust for the same reason. A weeping seal is a negotiating point. A seized pump is a lost week.
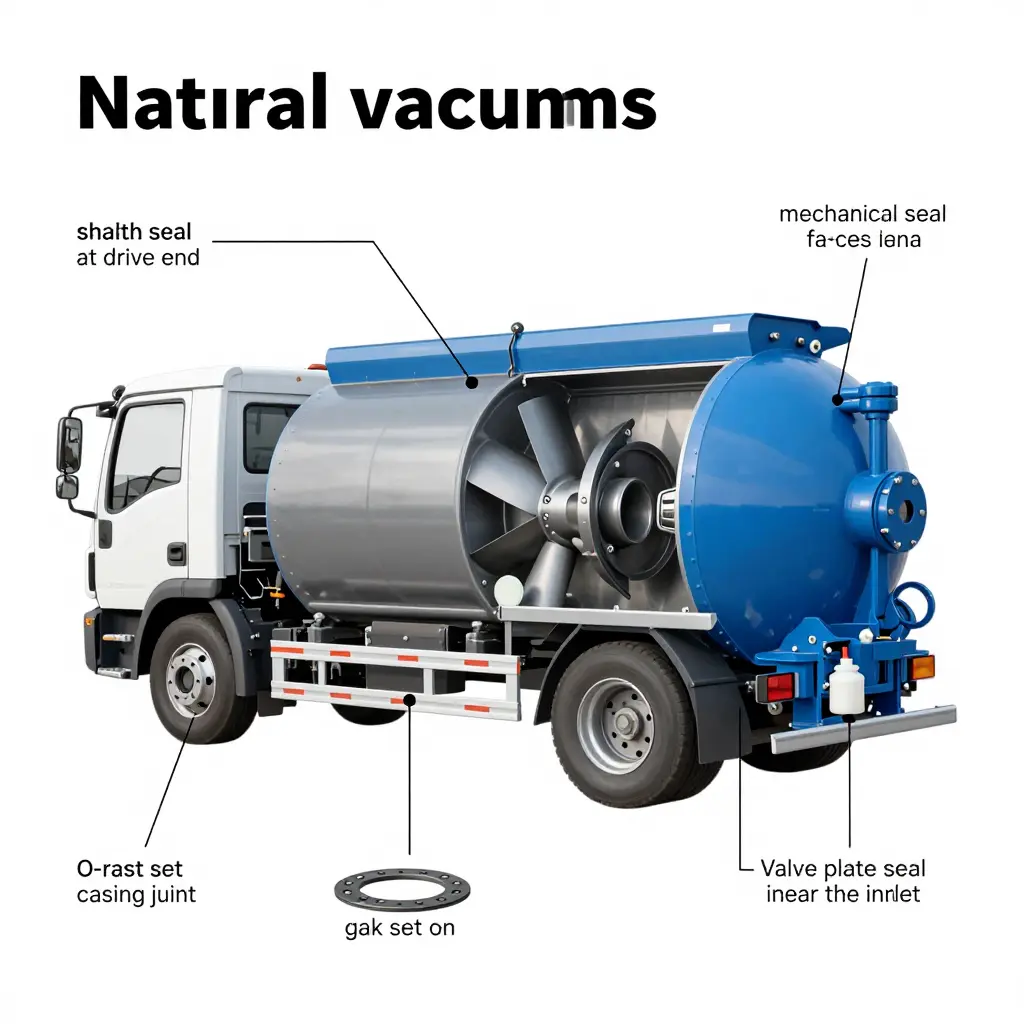
Four pump layouts, and where each one leaks
Know the pump before you judge the seal. Four layouts dominate septic service. Sliding vane pumps are simple, self-priming and tolerant of wet loads, but the shaft seal runs dry the moment the oil level drops. Liquid-ring pumps use a water ring instead of vanes, so seal failure often shows up as water in the bearing housing rather than as lost vacuum. Rotary lobe pumps move large volumes fast and depend on tight clearances plus a robust lip seal at each shaft. Combination vacuum/pressure units add a pressure side, which doubles the seal count and turns valve plate seals into a real wear item.
Where the seals sit, and how each one fails:
| Seal location | Typical failure mode |
|---|---|
| Shaft seal (drive end) | Worn lip from grit and heat, oil weeping down the frame |
| Mechanical seal faces | Face scoring from dry running, chipped carbon, abrupt vacuum loss |
| O-rings (casing, ports) | Hardened or swollen elastomer, slow leak at joints |
| Gasket sets (covers, flanges) | Compressed or blown gasket, air ingress under vacuum |
| Valve plate seals | Eroded seating, oil pushed into the tank or sludge pulled into the pump |
Six seal checks to run in order on any truck you are serious about buying:
- Check for oil weeping and septage staining at the shaft. A damp ring or brown crust around the drive end means the seal has already been leaking.
- Inspect seal housing temperature and shaft runout. A warm housing after a short run plus visible wobble points to bearing or alignment damage, not just a tired seal.
- Look for scoring on the shaft sleeve. Grooves you can catch a fingernail on mean a new seal will keep cutting itself apart.
- Verify lubricant condition and level on oil-lubricated pumps. Milky, gritty or overfull oil means condensate or septage is getting past a seal.
- Confirm seal compatibility with the fluids hauled. Elastomers rated for water may swell or harden when the truck hauls greases, chemicals or high-solids septage.
- Test vacuum retention after shutdown. Pull full vacuum, shut down and watch the gauge. A drop within a minute points to leakage at seals, gaskets or the tank connection.
How failure announces itself. A failing seal rarely throws a code. It shows up as lost vacuum under load, longer cycle times per tank, lubricant that turns dark or milky, and odour carry-over through the pump and out the exhaust. Any one of those symptoms justifies opening the seal housing before money changes hands. It also helps to understand how pump and tank ratings can mismatch, because a correctly rated pump with a worn seal still behaves like a broken truck. More on that in vacuum pump and tank baffle rating mismatches.
Cold, hot, and holding vacuum
Seals cost little, and they carry the business case for a used septic truck in Maryland. Inspect them cold, run them hot and test retention before you sign. If the pump holds vacuum, the oil stays clean and the shaft sleeve shows no scoring, you are buying a working asset instead of a repair bill.
Table 1: Seal service profile for the septic tank truck vacuum pump options most Maryland haulers run. Match the pump type to how your routes actually work.
| Pump Type | Typical Septic Duty | Seal and Wear Parts | Common Failure Sign | Inspection Method | Maintenance Interval |
|---|---|---|---|---|---|
| Sliding vane | Intermittent start-stop pumping; most tolerant of on-off duty | Vanes, shaft lip seal, cylinder liner, end plates | Vacuum fades at low rpm; vanes stuck or chipped | Pull end cover; measure vane length and tip clearance | Vane and oil check every 100-150 h; seal rebuild at 1,000-1,500 h |
| Liquid-ring | Continuous high-vacuum work; handles wet carry-over | Mechanical seal, impeller, port cones, service liquid | Rising service-water use; visible seal drip; vacuum loss | Service-liquid flow check, seal leak trace, shaft end-play gauge | Service liquid check daily to 50 h; seal inspection near 2,000 h |
| Rotary lobe | Continuous high-airflow transfer, often dry running | Timing gears, lobes, lip seals, bearings, gear oil | Gearbox oil weep; oil mist in inlet line; whine under load | Oil sampling, gear lash check, inlet filter and relief valve test | Oil change 1,000-2,000 h; seal and bearing check 3,000-5,000 h |
| Combination vacuum/pressure (blow-off) unit | Dual duty: vacuum fill then positive-pressure discharge | Changeover valve seats, vanes or lobes, shaft seal, relief valve | Cross-seepage between vacuum and pressure sides; weak blow-off | Isolate each side; pressure-hold test and valve seat inspection | Valve and seal check 500 h; full seal service 1,500-2,000 h |
Intervals above are indicative only. Follow the OEM manual for the specific pump model and your duty cycle.
Functional Tests Before Payment: Vacuum Retention, Pressure Hold and Flow Rate
The pump and the tank are the only parts of a septic truck that earn money. Rust, tires and paint are expensive problems, but at least they are visible. A pump that cannot hold air, a valve seat that leaks, or a PTO that howls under load stays invisible until the first job, and it costs more than the discount a buyer wins over a wheel arch. So run the functional tests before money moves, and treat every spoken promise as a question that still needs an answer.
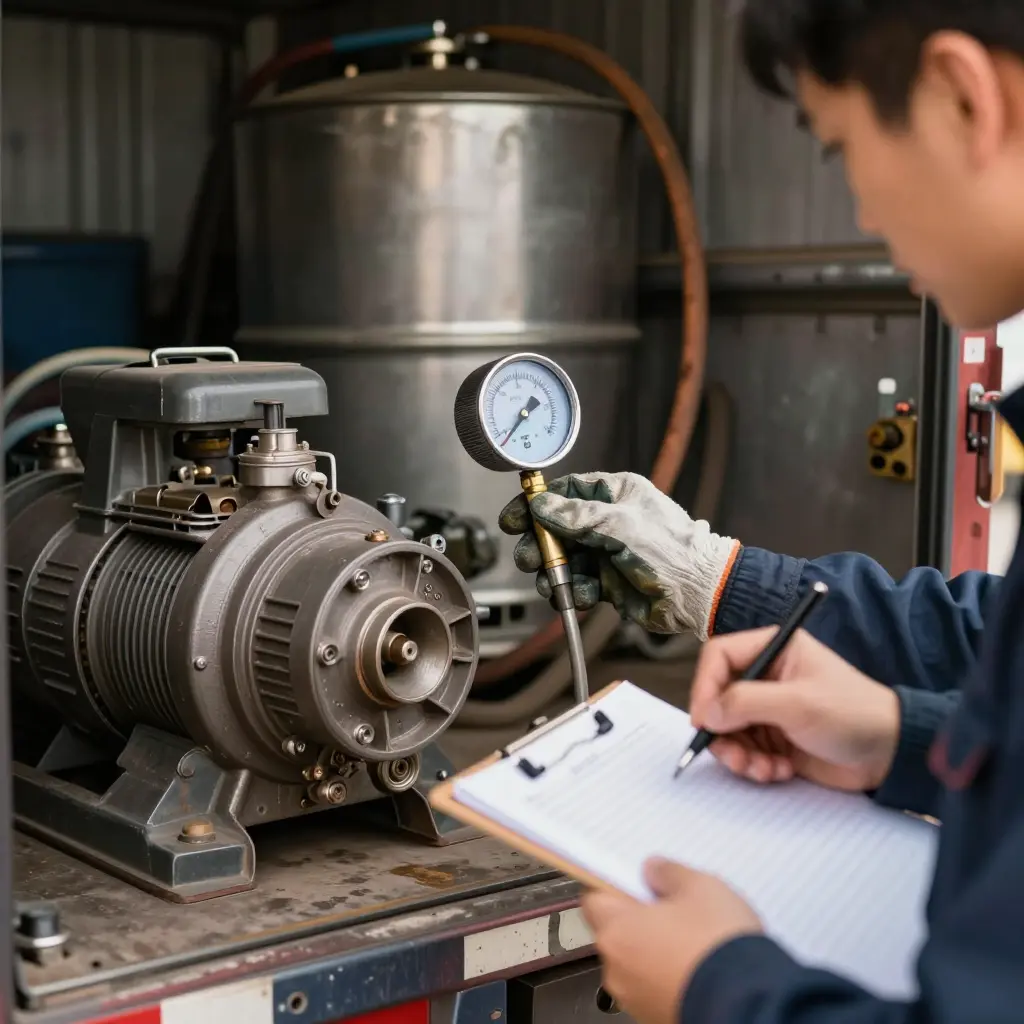
Step 1: The Vacuum Retention Test
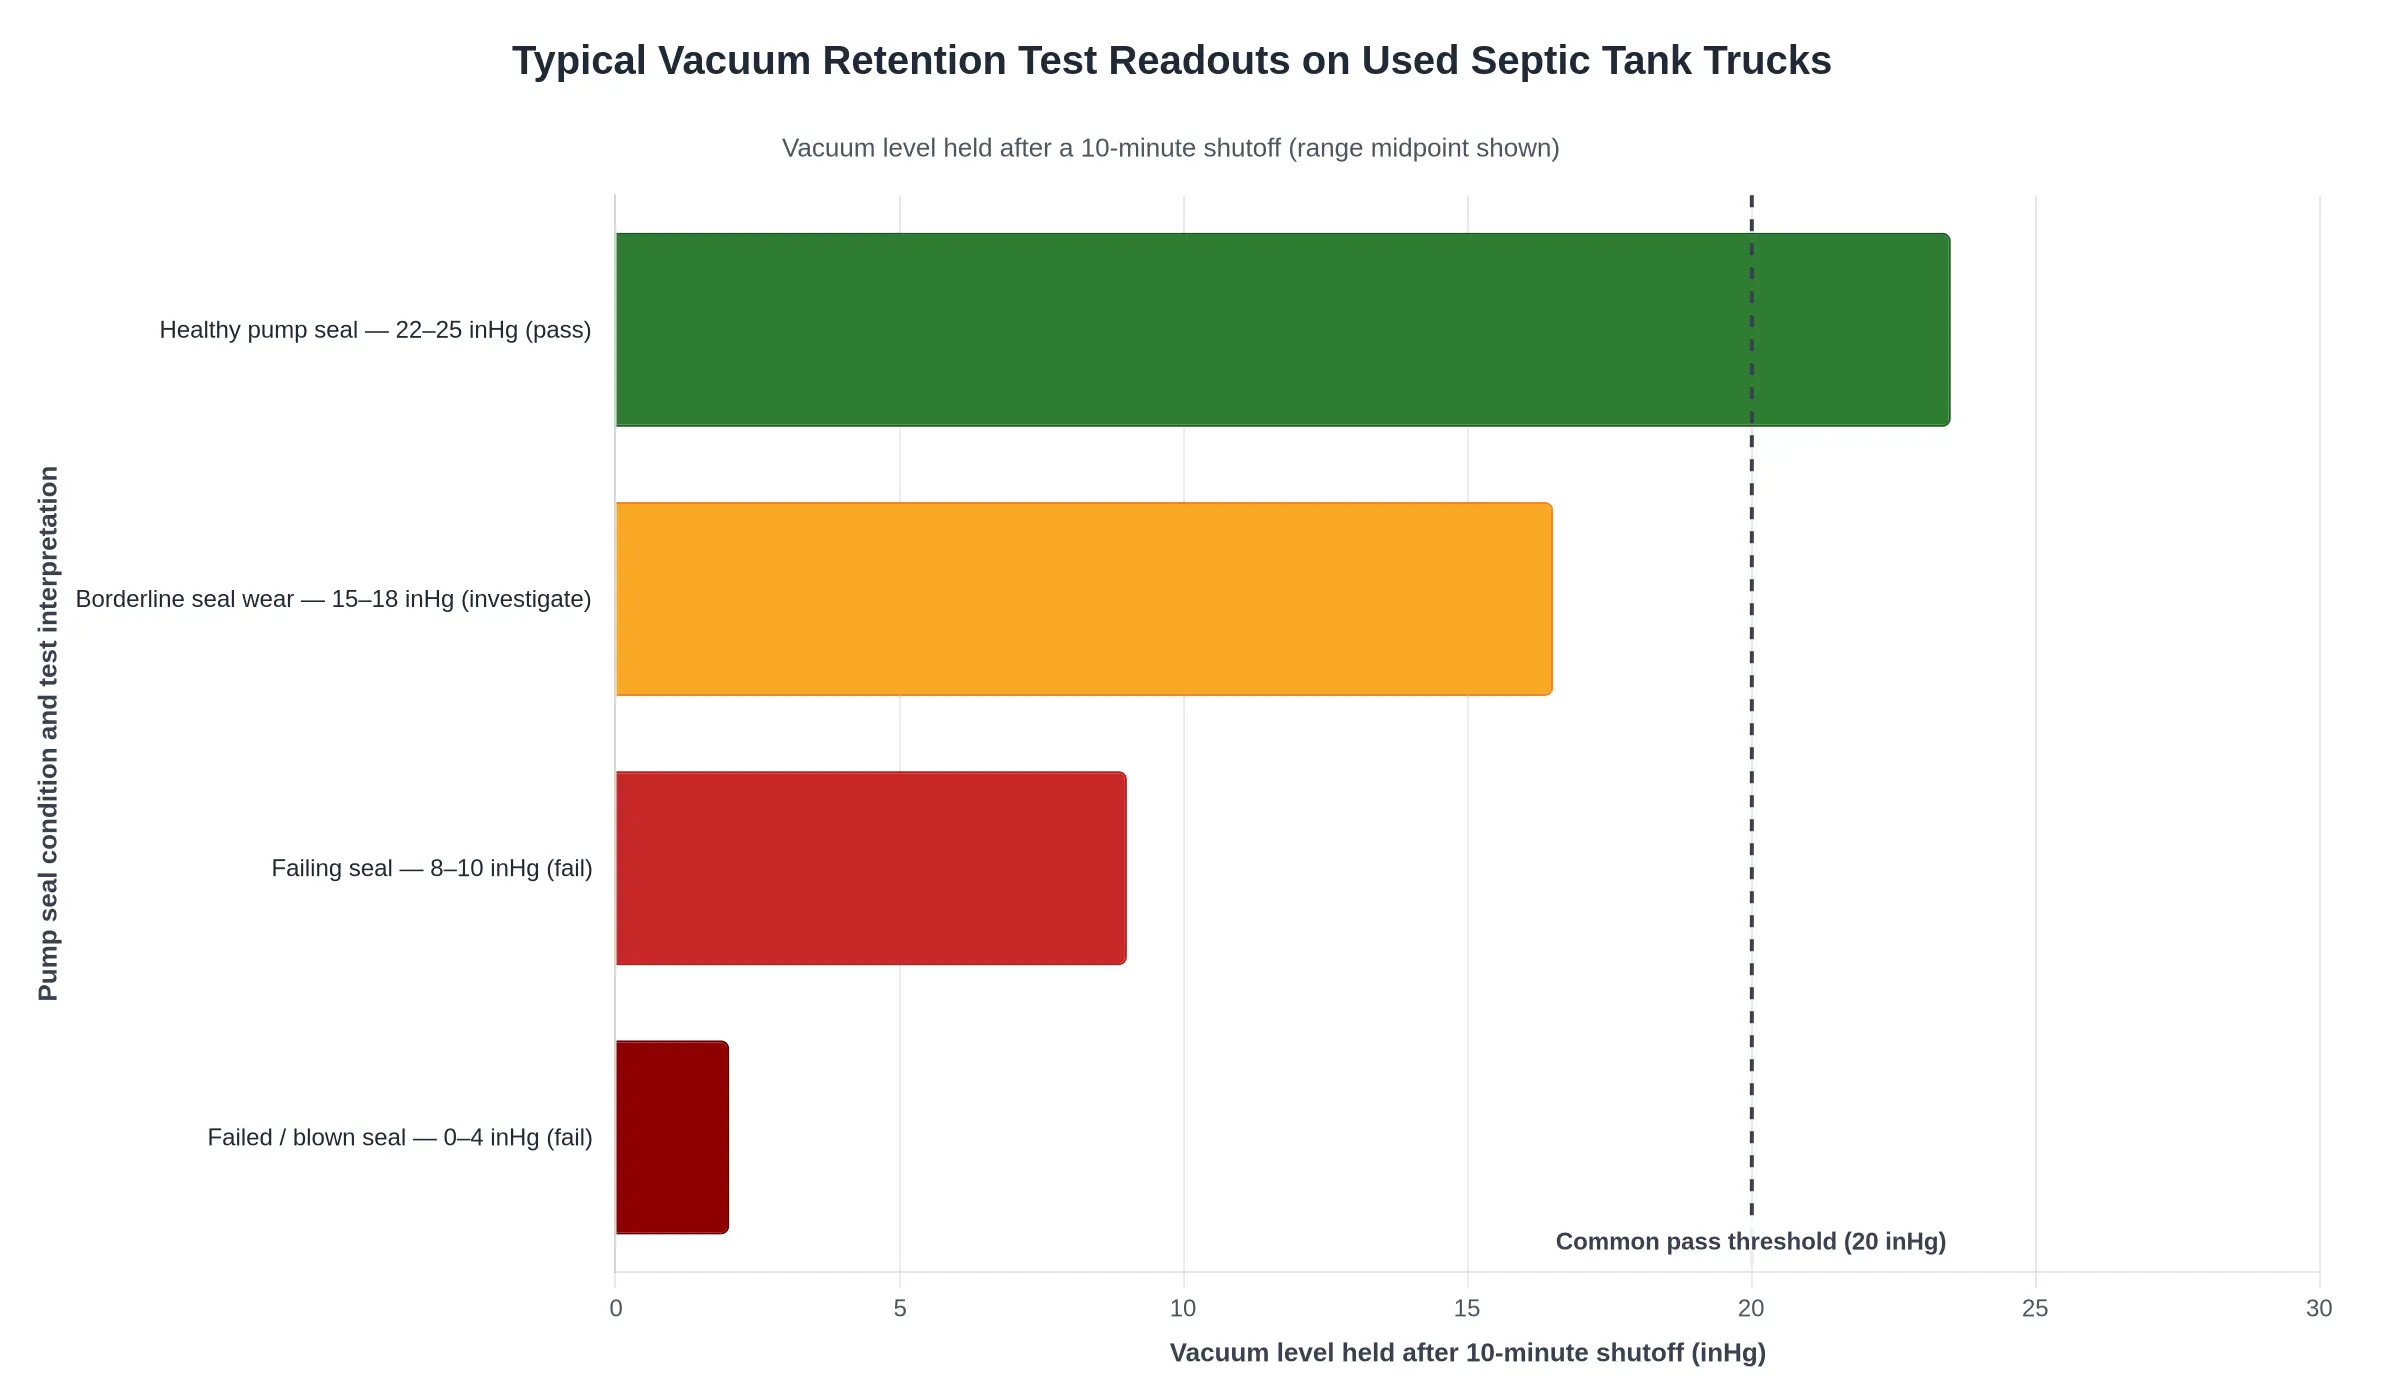
A vacuum retention test is simple, which is why it exposes so much. Warm the pump for two or three minutes, cap or close every inlet and the tank drain, pull down to the pump’s rated vacuum, then shut the pump off and watch the gauge. A healthy rotary vane unit typically reaches 20 to 25 inHg; an older unit or a liquid-ring pump may be rated nearer 15 to 20 inHg.
Record the reading every 60 seconds for ten minutes. A sound tank, lid gasket and pipe run will hold about 20 inHg or better at the ten-minute mark, which works out to no more than around 2 inHg of total loss on a pump that started at 22. A fast collapse in the first 30 seconds points at a lid seal or an inlet cap. A slow, steady bleed usually points at a hose, a valve seat, or pump seal checks that were never done. Manufacturer specs outrank any rule of thumb, so ask for the pump datasheet.
Step 2: Pressure and Blow-Off Test (Combination Units)
On combination jet/vac or pressure-rated units, repeat the test in reverse. With the tank drain closed, pressurise slowly to 5 to 8 psi, confirm the relief valve opens at its set point and reseats cleanly, then hold for ten minutes. Most inspectors accept a drop of no more than 2 psi over that window. Fuel and vapour tankers fail here for the same reasons septic tanks do: gaskets, seat faces and relief valves. The pattern is well documented in this breakdown of why annual pressure tests fail at the same weak points, and it transfers directly to a septic pumping truck inspection.
Step 3: Flow Rate and Discharge Timing
Draw a measured volume, or time a full load, then time the discharge through the hose you will actually run in the field. A typical 2,500-gallon load through 3-inch plumbing and a healthy pump should discharge in roughly 8 to 12 minutes. Slower than that means a worn impeller, a collapsing hose liner or a partly blocked valve. Note the ambient temperature and fluid type, because cold, heavy sludge always slows the clock.
Step 4: Hose and Valve Seat Integrity
Cap each hose, apply vacuum and listen along its length. Flex it under load; pinholes often only open when the hose bends. Pull the valve bodies and look at the seat faces for pitting, scoring and hardened or torn gaskets. A seat that weeps air will weep liquid on a customer’s driveway.
Step 5: PTO Engagement and Driveline
Engage the PTO at idle, then again at 1,000 to 1,200 rpm, listening for grind, rattle or a delayed bite. Check the slip yoke, U-joints, PTO shaft guard, mounting bolts and hydraulic lines for chafe and leaks. A driveline that vibrates under load will destroy a pump bearing within a season.
| Test | Target reading | Acceptable result |
|---|---|---|
| Vacuum retention | 20 to 25 inHg | 20 inHg or better after 10 min, no fast early bleed |
| Pressure hold (combo) | 5 to 8 psi | Under 2 psi loss over 10 min, relief valve reseats |
| Discharge time | 2,500 gal load | 8 to 12 min through 3 in hose |
| PTO engagement | Idle and 1,000 to 1,200 rpm | No grind, immediate bite, no vibration |
Who Should Witness and Record It
You hold the gauge and the pen, or a third-party mechanic you pay does. Not the seller’s shop foreman alone. Photograph the gauge at each interval, film the discharge, and log the date, ambient temperature, pump serial number and hour meter reading. Both parties sign the sheet.
Why a Verbal Assurance Is Not Evidence
“The pump pulls great, we just serviced it” is a sentence, not a test. A vacuum pump can feel strong at the nozzle while leaking past a lid gasket, and a resealed pump can lose that seal again within a month of grit. Without a gauge reading on paper you have no baseline, no recourse and no negotiating position when the first call-back comes.
Records a Buyer Should Keep
- Timed vacuum retention test sheet with gauge photos at each 60-second interval
- Pressure hold and relief valve results, if the unit is a combination truck
- Discharge timing log with the measured volume and hose size used
- PTO and driveline inspection notes, including the mechanic’s name and licence or shop details
- Signed seller acknowledgement plus pump and tank serial numbers and hour meter reading
Pass or Fail
Pass the unit only if vacuum still reads 20 inHg or better ten minutes after shutdown, the discharge finishes inside 12 minutes, and the PTO engages cleanly at operating rpm with no driveline vibration. Between 15 and 20 inHg at ten minutes, price a seal and valve service into your offer. Below 15 inHg, or a needle falling steadily toward zero, the pump needs attention before it goes on a route. Any single failure is a repair quote, not a discount to guess at. Fix the number before you sign, or walk away.
Vacuum Retention Decay After Shutdown
A vacuum retention test is the cheapest leak-down check available on a used septic tank truck, and it tells you more about the pump than any service record. Pull a full vacuum on an empty, sealed tank, shut the pump down and watch the gauge. A sound seal holds. A tired one bleeds off quickly enough that you can see it while standing beside the truck.
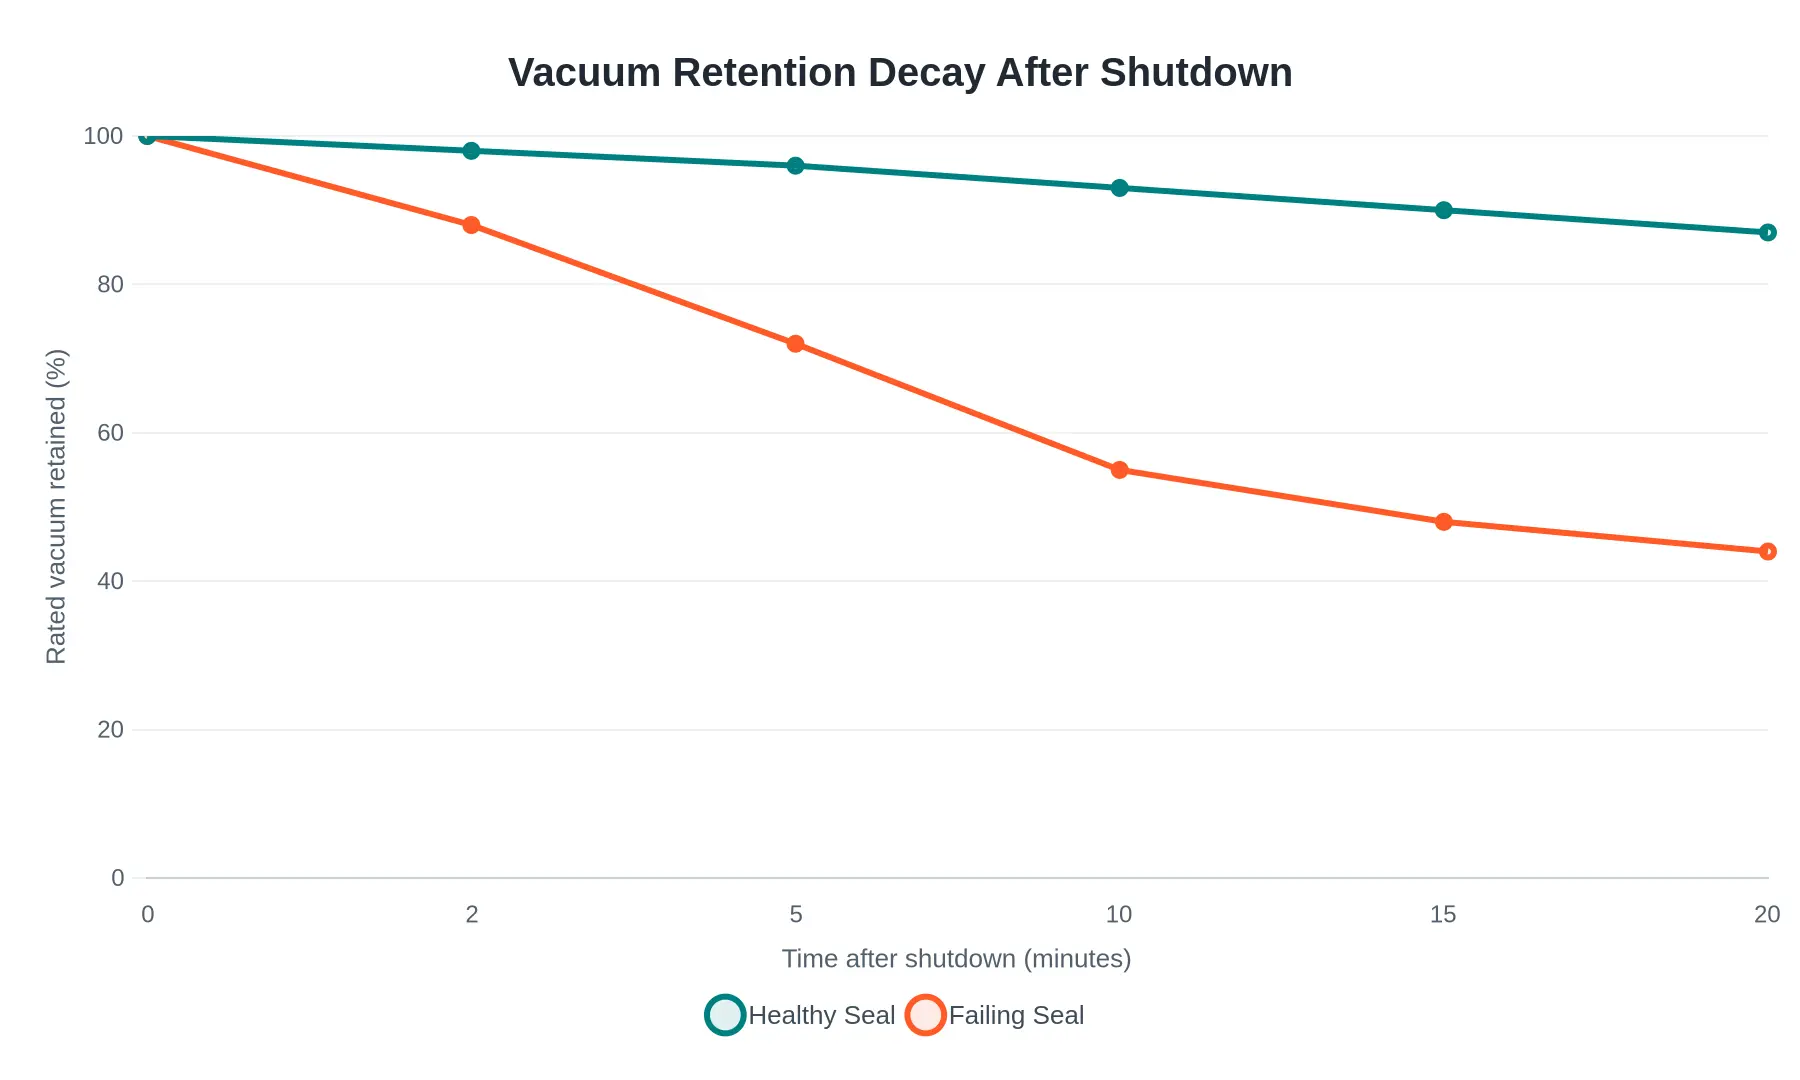
Caption: The gap between the two curves is the test. A healthy vacuum pump seal still holds about 87 percent of rated vacuum after 20 minutes; a failing one is past the halfway mark by minute 10.
The data behind the chart
| Time after shutdown (min) | Healthy Seal (% rated vacuum retained) | Failing Seal (% rated vacuum retained) |
|---|---|---|
| 0 | 100 | 100 |
| 2 | 98 | 88 |
| 5 | 96 | 72 |
| 10 | 93 | 55 |
| 15 | 90 | 48 |
| 20 | 87 | 44 |
How to read the curve on a pre-purchase inspection
Healthy seals track the flat line because the shaft seal, valve plate and hose connections are all holding, so the only loss is normal micro-leakage. Once the lip seal hardens, the valve seats score or a hose ferrule starts weeping, the tank pulls air continuously and vacuum bleeds off in a hurry. On a septic truck that means slower pulls, more run time per gallon, and a pump that overheats in July.
The percentages below assume a warm pump that pulled to its rated vacuum, so they describe the same thing the pass rule measures: how fast the system loses vacuum with the pump off.
- Above 90 percent at 10 minutes: the seal is healthy. Keep the number in your inspection notes as a baseline for the next year of service.
- 75 to 90 percent at 10 minutes: borderline. Expect a seal or valve service within a season; factor that into your offer.
- Below 60 percent at 10 minutes: walk away, or price the truck as though the pump needs an overhaul, because it usually does. Check the tank shell while you are there, since chronic vacuum loss often hides a pinhole in a weld.
Run the test warm, not cold. Rubber seals expand and seal better at operating temperature, so a truck that passes cold can still fail hot. Run it twice, record both numbers, and look at the decay rate rather than a single reading. A truck that holds 95 percent for two minutes and then slides to 70 by minute ten is telling you something a snapshot gauge check never would.
One more field note: before you blame the pump, cap the inlet and isolate the tank from it. If the tank alone holds vacuum but the system does not, your leak is in a hose, a valve or a fitting rather than the seal. That distinction is the difference between a $60 hose and a $1,400 pump rebuild, and knowing which is which is how you avoid overpaying. If you also want to know how pump type and tank size move the asking price on these units, this breakdown of how tank size and vacuum pump type split the cost is worth reading before you negotiate.
Maryland Paperwork That Must Match the Iron Before You Pay
Chassis rust and pump seals tell you what the truck looks like today. The paperwork tells you whether it can legally work tomorrow. In Maryland, a septic truck purchase fails at the counter far more often than on the lift, because the documents have to agree with the metal bolted to the frame.
Three deals, one serial number
You are buying a titled vehicle, a regulated waste hauler and a pressure vessel. Each has its own paper trail, and all three have to line up on serial numbers and ratings. When any document disagrees with the rating plate, the truck stops being a truck and becomes a negotiation.
What the file has to contain
Title, lien status and disclosure. Start with the Maryland title itself. Confirm the seller’s name matches the bill of sale, that every listed lienholder has provided a release, and that the vehicle identification number matches the frame stamp, not just the door sticker. Odometer disclosure rules exempt many heavy trucks above 16,000 lbs GVWR, so a blank or “exempt” odometer block is not automatically a problem. What is not optional is the hour-meter or PTO hour reading, which is your real wear indicator on a vacuum pump and should be written into the bill of sale.
Registration and plates. Maryland registration is weight-based, so confirm the registered gross vehicle weight equals or exceeds what you plan to haul. A septic truck plated light to save fees becomes a citation the first time a scale ticket shows a full load. Ask whether commercial plates, apportioned (IRP) plates for interstate runs and a USDOT number are already active, and confirm the entity name on the USDOT record before you transfer money.
Inspection status. Used vehicles in Maryland generally need a valid state safety inspection at title transfer, and the inspection certificate has a shelf life, so check its date against your closing date. Separately, the truck needs a current federal DOT annual inspection under 49 CFR 396.17, plus brake and lamp records. A clean safety sticker and an expired annual inspection report are two different failures.
Weight ratings against real roads. Compare the rating plate, axle ratings, tire load ratings and the Maryland bridge formula limits. Single axles, tandem groups and wheelbase all cap your legal gross, and Eastern Shore and rural county bridges add local postings. A 6,000-gallon load of septage is roughly 50,000 lbs of payload before the truck is counted, so pull a scale ticket with a full tank if the seller will allow it.
Septage hauler and environmental permits. Hauling septage in Maryland means Maryland Department of the Environment hauler registration plus county health department disposal approvals for the sites you intend to use. Confirm the seller’s disposal points will accept you, and check for any manifesting or land-application records that transfer with the operation.
The tank certification package. This is where careful buyers separate from hopeful ones. Request the hydrostatic or vacuum test certificate with serial number and test pressures, material and plate thickness certifications with ultrasonic readings, baffle ratings, and the pump rating in CFM and inches of mercury.
The mismatch that stalls a pickup
One inconsistency is enough. The rating plate says 25 inches Hg and 1,000 gallons, the certificate lists a different serial number or a lower test pressure, and the sliding-vane pump is rated for a duty cycle the tank was never certified for. Suddenly the buyer’s insurer, or the inspector handling the septic pumping truck inspection, refuses to sign. The seller cannot produce a reissued certificate on a Saturday, the deposit is already wired, and a truck that ran fine on the test drive sits idle in the yard.
| Field | On the rating plate | Must match certificate and pump |
|---|---|---|
| Serial number | Stamped plate number | Same serial on test document |
| Capacity | Tank gallons | Baffle and load ratings |
| Pressure | MAWP and vacuum limit | Test pressure and pump inHg |
| Pump | CFM and duty rating | Tank volume turnover |
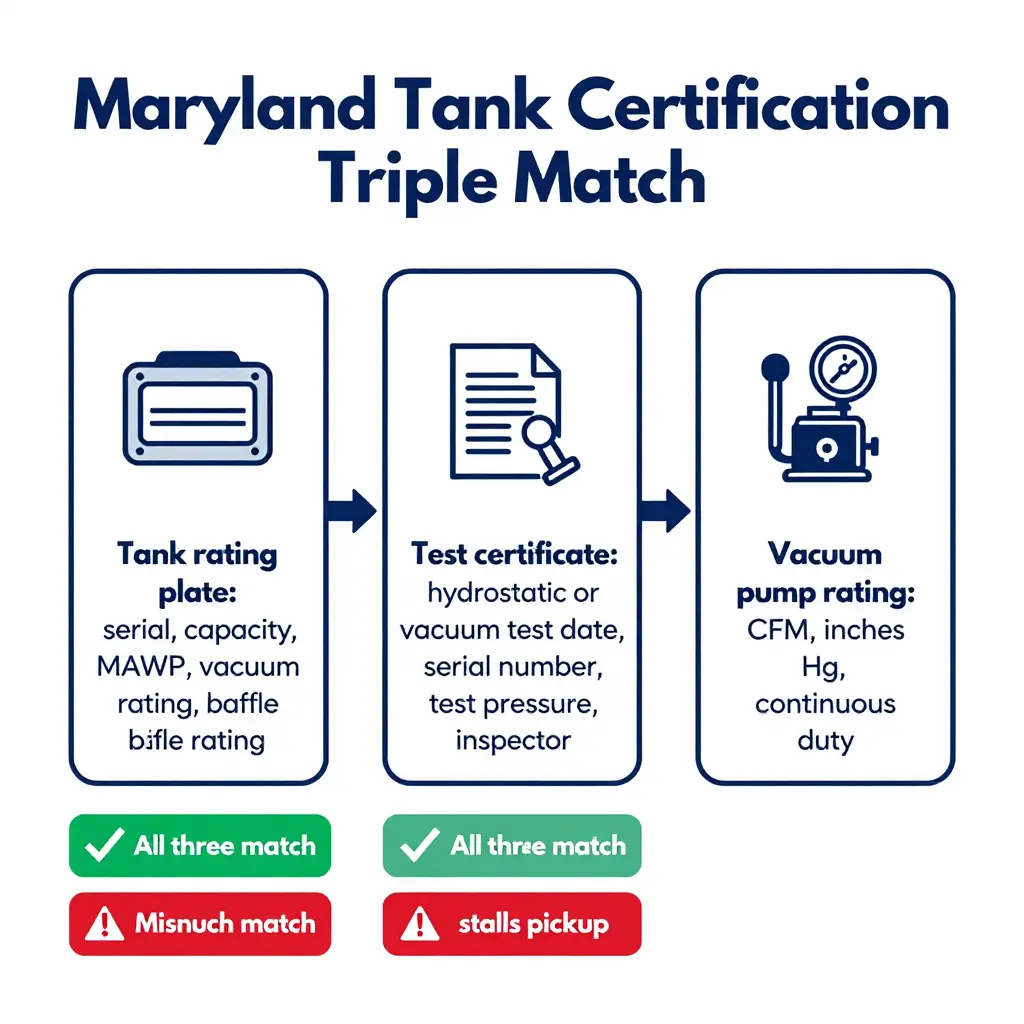
Before you send a deposit, request this document set
- Maryland title with lien releases, plus a bill of sale listing VIN, hour-meter reading and price.
- Current state safety inspection certificate and federal DOT annual inspection report.
- Registration card showing gross vehicle weight, plate type and USDOT number.
- MDE septage hauler registration and county disposal approvals.
- Tank test certificate with serial, date and test pressures, plus material and thickness certifications.
- Rating plate photo and pump nameplate photo, taken on the same visit as the chassis photos.
The part that stops the deal
Paperwork is not the boring part of buying a septic tank truck in Maryland: it decides whether the truck can be insured, permitted and loaded on Monday morning. If the certificate, the plate and the pump do not agree, do not pay. Ask for corrected tank certification, or walk and keep your deposit. Rust and seals cost money. A mismatch on paper can cost you the whole deal.
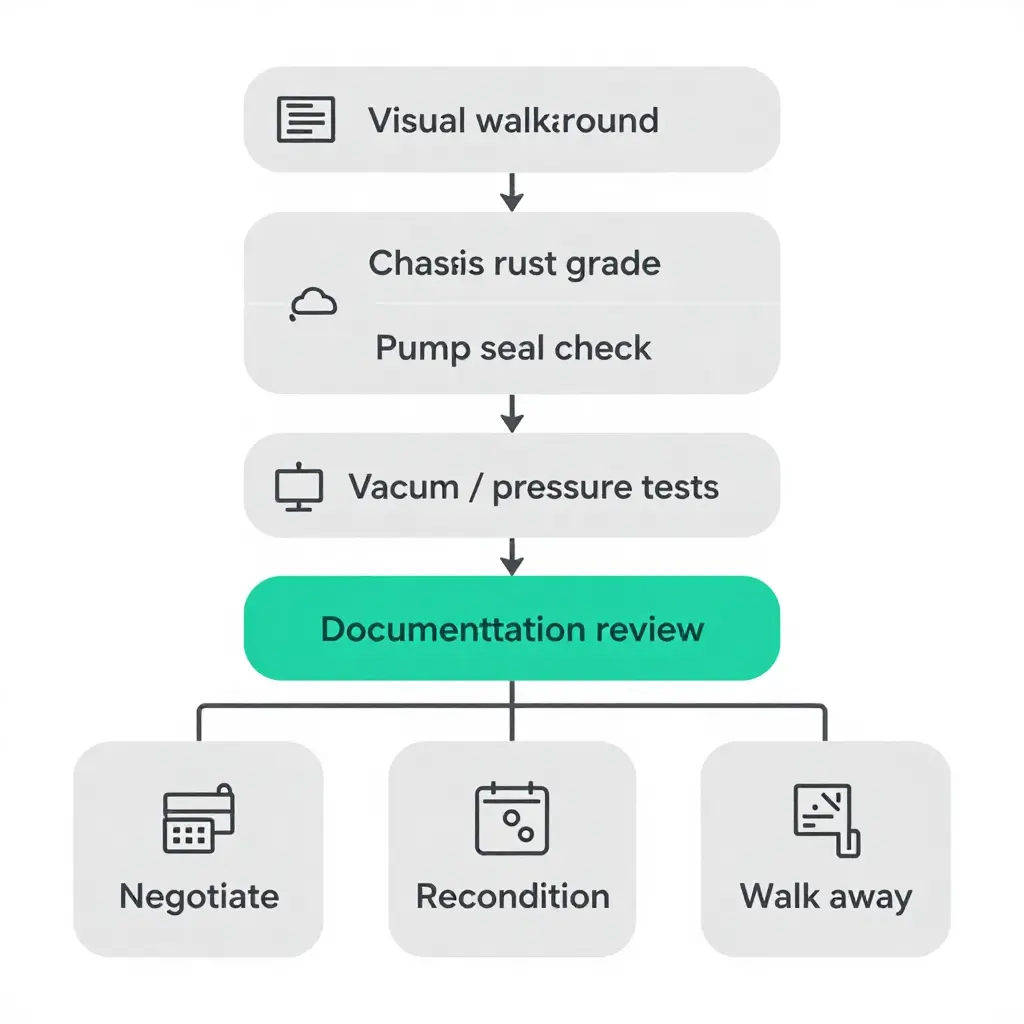
Figure: The pre-payment septic pumping truck inspection sequence – one fixed order of checks, one three-way decision at the end.
A disconnected checklist invites shortcuts. Run the checks in this order and each step feeds the next: the walkaround tells you where to look for rust, the rust grade tells you whether the pump and tank are worth testing, and the test results tell you whether the paperwork is the last hurdle or a deal-breaker. Only after documentation review do you split into negotiate, recondition or walk away. If you are already comparing listings for a septic tank truck for sale in Maryland, keep this flowchart on your phone and run it on every unit, in the same order, every time.
Pricing the Findings: Repairs, Negotiation and Walk-Away Lines
Every defect on an inspection sheet has a dollar value, and that value is the basis of your negotiation. The point is not to argue a seller down for sport. It is to make the asking price reflect the truck you are actually buying. Rust grades and pump seal results only become useful once you convert them into line items a shop would bill you for.
From rust grades and seal findings to dollar deductions
Match the severity of the finding to the repair it forces. Surface rust on a crossmember means wire brushing, treatment and recoating: a few labour hours and materials. Heavy scale with pitting on a frame rail means cutting out and welding a plate, plus recoating and rechecking alignment. Perforation means section replacement, and that is a fabrication job with a real invoice attached. On the pump side, a seeping or hardened seal is a reseal kit and labour; a scored shaft or worn rotor after resealing is a replacement pump. Record the grade, the shop’s fix and the quoted price side by side before you talk numbers.
Buy independent estimates, not seller quotes
A seller’s “it just needs a seal kit” is worth nothing at the negotiating table. Take the truck, or detailed photos, frame measurements and pump model numbers, to an independent heavy-duty shop in your area and ask for a written line-item estimate with labour hours and part numbers. For frame work, get two or three quotes, because fabrication pricing varies widely between shops. Bring the pump seal checks you or your mechanic performed, including vacuum retention figures before and after resealing, so the shop prices the correct outcome rather than a guess. If you are working through used septic tank truck listings in Maryland, insist the estimate be written against that specific truck’s VIN and hours.
Weigh reconditioning against price and remaining service life
Run the math on total outlay, not sticker price. A cheaper unit needing $9,000 of frame and pump work is rarely the better buy when a cleaner truck is $7,000 more. Compare repair cost as a percentage of asking price, then look at remaining service life: annual mileage, chassis age, tank condition, and how many years of pumping routes the truck can realistically serve. Work out how tank size and vacuum pump type split the price before you judge whether a quote is fair.
A simple three-year total cost of ownership
Add acquisition, immediate reconditioning, scheduled wear items and downtime. The example below is illustrative. Substitute your own shop quotes and route revenue.
| Cost line | Year 1 | Year 2 | Year 3 | Three-year total |
|---|---|---|---|---|
| Purchase price | 58,000 | 0 | 0 | 58,000 |
| Tank certification and paperwork | 1,500 | 0 | 1,500 | 3,000 |
| Pump seal rebuild plus PTO and driveline service | 2,800 | 0 | 3,200 | 6,000 |
| Frame repair and re-coating | 3,500 | 600 | 800 | 4,900 |
| Hoses, valves, fittings | 1,200 | 900 | 1,100 | 3,200 |
| Downtime (6 days at 900/day) | 5,400 | 1,800 | 2,700 | 9,900 |
| Total | 72,400 | 3,300 | 9,300 | 85,000 |
That framing answers the question that matters: what does this truck cost per year of productive service? For a fuller picture of the drivers behind septic tank truck cost, review the component-level breakdown before you set your ceiling.
Deductions worth negotiating
- Frame perforation or heavy scale at a load-bearing bay – deduct the full fabrication quote plus a contingency.
- Failed vacuum retention after resealing – deduct a replacement pump, not a seal kit.
- Missing or expired tank certification – deduct recertification cost and the days it costs you.
- Worn hoses, valves and fittings – deduct parts plus labour hours from a written estimate.
- Tires, brakes and PTO wear found at inspection – deduct the shop figure, never an averaged guess.
Walk-away lines
Three findings should end the conversation regardless of price. First, perforated frame sections at load-bearing points: no discount compensates for a chassis that may not pass inspection or carry a full tank safely. Second, undocumented tank certification: without traceable pressure-test paperwork you cannot prove the barrel is fit for service. Third, a pump that fails vacuum retention after resealing, because that is a replacement, and it signals deeper neglect in the system it serves.
Arithmetic with evidence behind it
Good negotiation is arithmetic with evidence behind it. Grade the rust, test the seals, price the repairs at an independent shop, and total the first three years. Then decide whether the number still makes sense, and walk away without hesitation when a frame, a certificate or a pump tells you no.
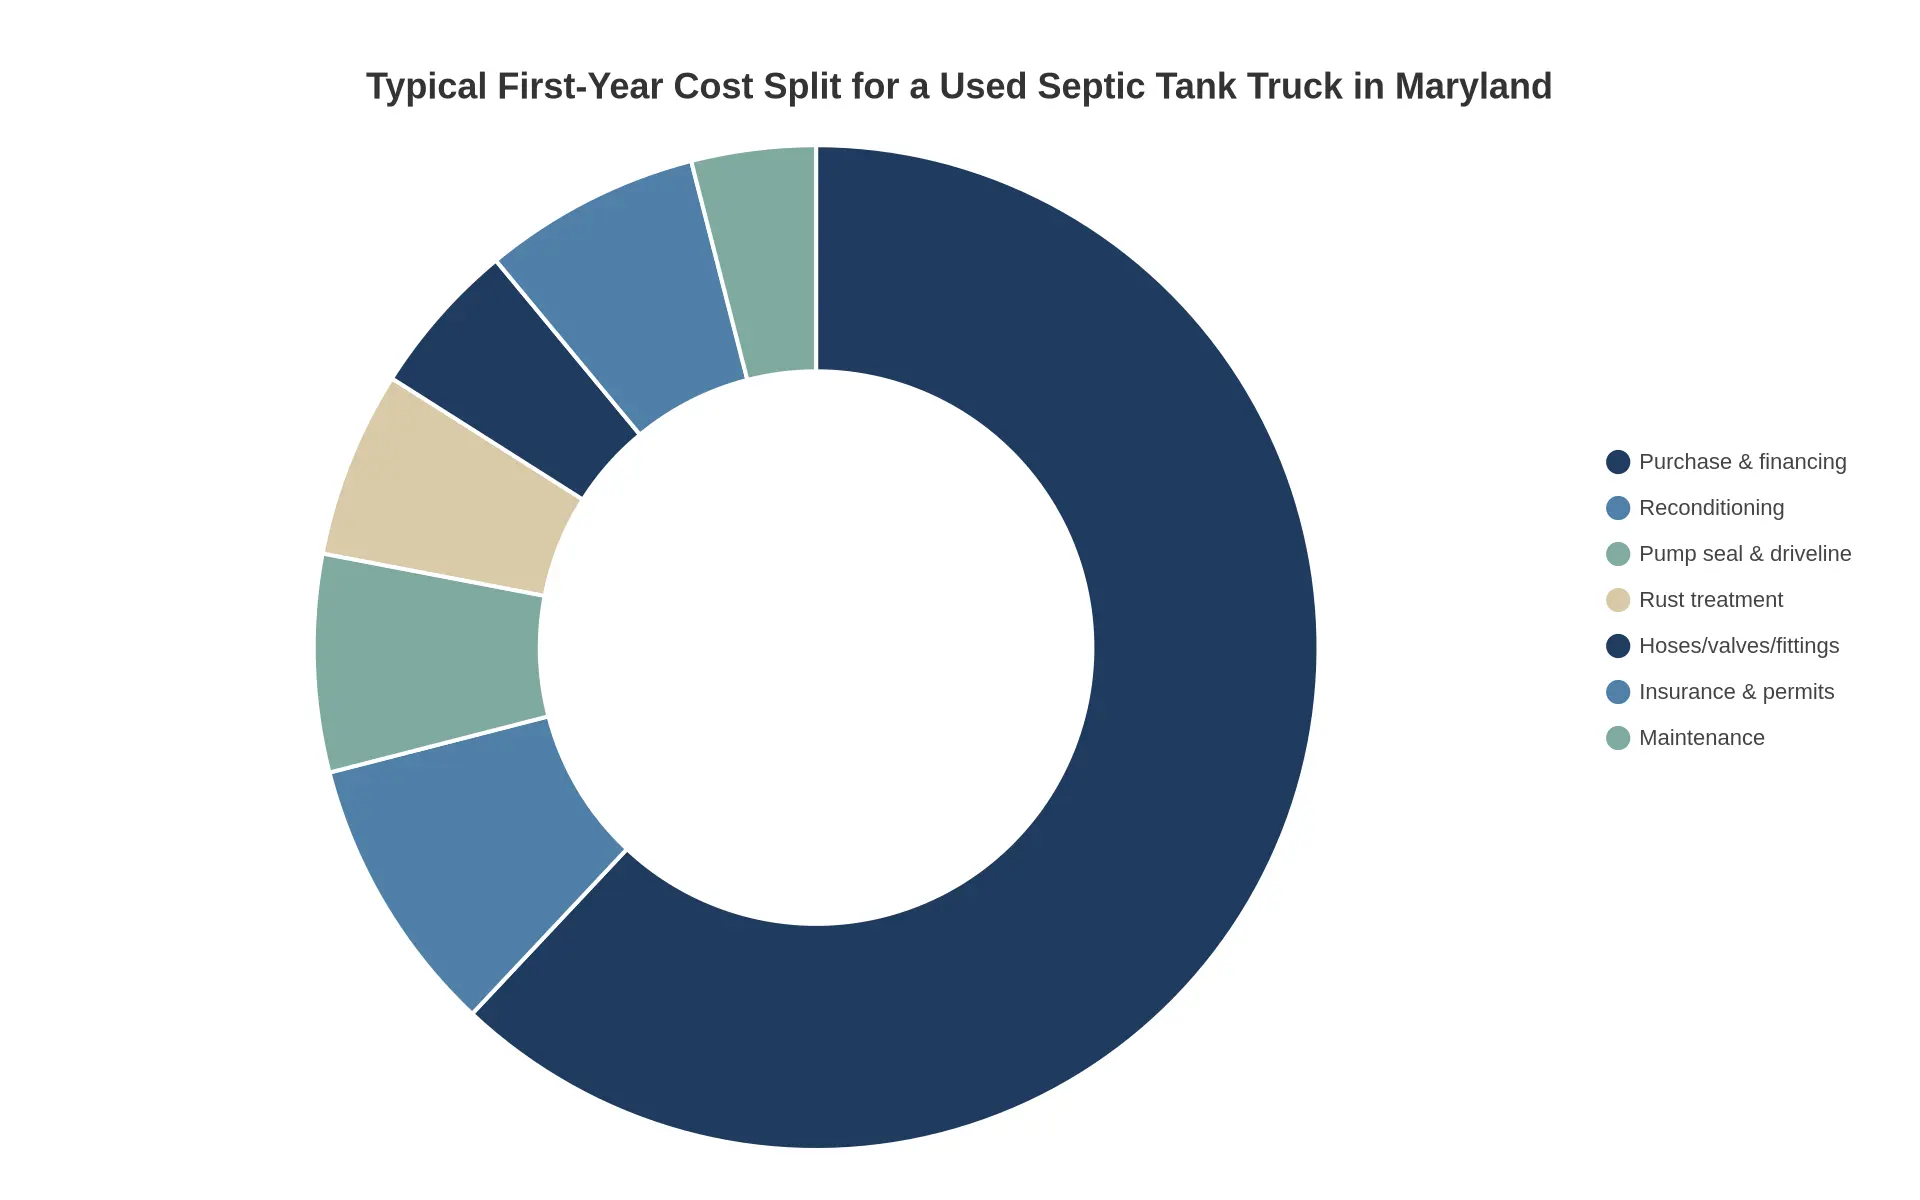
The sticker price is only six of every ten dollars
Buyers in Maryland tend to budget for the sale price and stop there. The ring above shows why that habit gets expensive: the purchase itself carries the chart, but the surrounding slivers are what turn a tight deal into a cash-flow surprise in the first twelve months.
| Cost segment | Share of year-one outlay |
|---|---|
| Purchase price and financing | 62% |
| Immediate reconditioning | 9% |
| Pump seal and driveline service | 7% |
| Insurance, registration and permits | 7% |
| Chassis rust treatment and coating | 6% |
| Hoses, valves and fittings | 5% |
| Scheduled maintenance | 4% |
| Total | 100% |
Two clusters deserve attention before you pay. Reconditioning, pump seal and driveline work, hoses and fittings add up to 21%, and that is the classic looks-fine-on-the-lot money. The 6% for rust treatment is Maryland-specific: road salt and wet tank bays find every thin spot in a frame rail or crossmember. Neither line disappears because the seller says the truck is ready to work.
Treat these shares as indicative planning weights, not quotes. A truck with fresh seals and a coated chassis shifts weight toward insurance and maintenance. A cheap unit with weeping seals and scale on the frame does the reverse.
Indicative shares only: the purchase price accounts for roughly six of every ten dollars spent in year one, so budget the remaining 38% before you sign. See our full breakdown of septic tank truck cost.
Tank Body, Baffles, Hoses and Valves: The Rest of the Condition Picture
Where the advertised volume actually lives
Chassis rust and weeping pump seals are easy to see, so buyers fixate on them. The tank shell, baffles and plumbing decide whether the truck can carry the volume it advertises and whether it stops in a straight line when the load shifts. A serious septic pumping truck inspection treats tank internals, relief devices and driveline guards as pass/fail items, not cosmetic details.
What the evidence should show
Start with the shell itself. Ask for ultrasonic thickness readings at the barrel, both heads and the bottom, then compare them against the nameplate minimum. Interior corrosion concentrates at the liquid line, along the bottom seam and beneath baffle welds where sludge settles. Pitting that has already consumed wall thickness cannot be corrected with a coat of paint, and any tank that has been lined needs documentation of the lining material and its compatibility with septage.
Baffle count is a specification, not a preference. Confirm the number of baffles matches the tank volume and compartment layout rather than trusting the seller’s description, and check the welds where each baffle meets the shell for cracks, undercut and corrosion behind the weld toe. That weld toe is the usual failure point. For background on how shell, baffle and compartment layouts are normally configured, review this guide to septic tank truck configuration.
Those welds carry surge load into the shell. Once they crack, the tank’s rated capacity can no longer be supported on paper, and some inspectors will refuse to certify the unit until the repair is documented. Too few baffles has the same practical effect: a full load sloshes further forward, lengthening stopping distance and raising rollover risk on off-camber driveways and unbanked rural roads in Maryland.
Sealing hardware is next. Manhole and hatch gaskets take a permanent compression set, so check for hardening, cracking and flattening, then inspect the sealing land for corrosion pitting. A hatch that leaks air will not let the pump pull full vacuum, which shows up later as slow fills and poor lift from deep tanks. Hinges, latches and over-centre clamps should close without force.
Level instrumentation deserves the same scrutiny. A clouded or stained sight tube hides the true fill level, so verify the gauge against an actual measured volume rather than the markings. Float-type indicators should move freely and read consistently across the range.
At the rear, work the valve through its full travel and look for seat wear, bent stems and leaking packing. Camlock arms should lock firmly with intact gaskets and dust caps present. Confirm that both the vacuum relief and pressure relief valves open at their rated setpoints with a gauge attached. A seized poppet can collapse a tank under vacuum or over-pressurise it during discharge.
Hoses fail from the inside out. Read the date codes, then flex each section looking for cracking, flattening, soft spots and a compromised wire helix on suction lines. Check the hose tray, stinger and all fittings for worn threads, missing gaskets and deformed camlock lugs. Finally, confirm the PTO shaft guard fully covers the rotating assembly and is fastened at both ends, then measure driveline backlash at the U-joints and slip spline. Excess rotational play signals worn components that will fail under pumping torque.
Five most commonly missed items
- Ultrasonic wall thickness readings taken at the bottom and liquid line instead of a visual interior check
- Baffle weld cracks at the shell attachment, hidden under residual product
- Vacuum and pressure relief valve setpoint testing with a gauge
- Hose date codes and internal helix damage on suction lines
- PTO shaft guard fasteners and driveline backlash at the slip spline
What to record
A truck with a clean frame and fresh pump seals can still be a repair estimate waiting to happen if the baffle welds are cracked, the relief valve is seized or the suction hose is past its service life. Record every finding and price it. Tank shell repairs, baffle rewelding and hose replacement are all quantifiable, and those numbers belong in the negotiation, not in the first month of ownership.
Build the inspection around dimensions, weld integrity and device function, and the buying decision becomes arithmetic rather than optimism.
Repair Ranges to Hold Against the Asking Price
A quoted purchase price only tells half the story. What decides whether a used septic truck is a good deal is how much of that chassis and pump work is already overdue. The chart below plots indicative low-to-high repair ranges for the components buyers most often get surprised by, priced with typical Maryland shop labour rates rather than national averages.
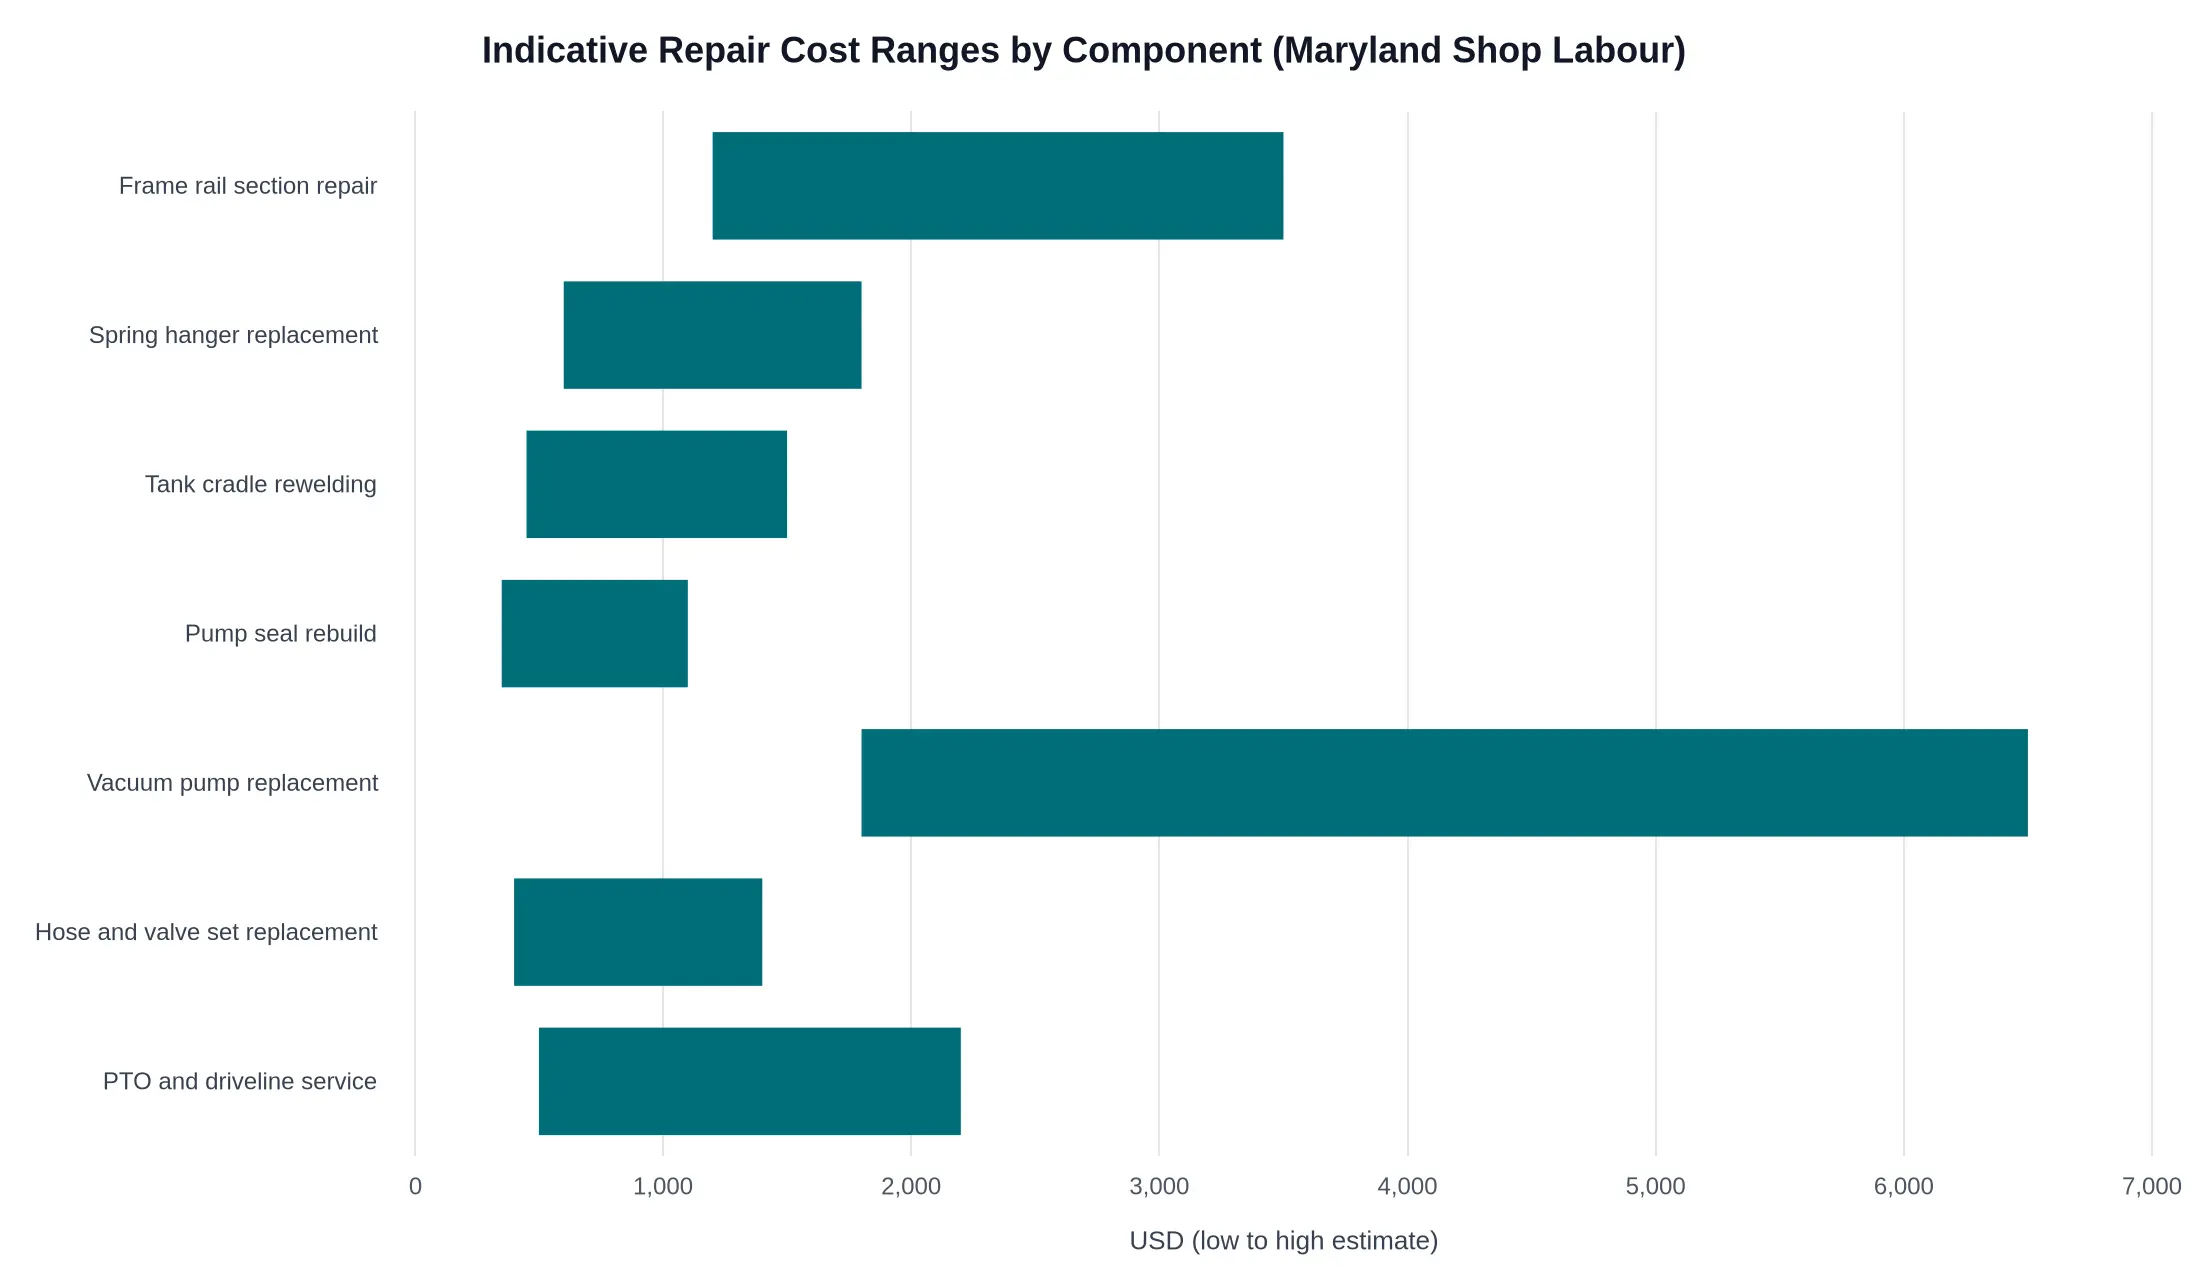
Indicative repair cost ranges by component, priced at Maryland shop labour rates, so you can weigh a quoted purchase price against likely immediate work.
The Numbers Behind the Bars
| Component | Low (USD) | High (USD) |
|---|---|---|
| Frame rail section repair | 1,200 | 3,500 |
| Spring hanger replacement | 600 | 1,800 |
| Tank cradle rewelding | 450 | 1,500 |
| Pump seal rebuild | 350 | 1,100 |
| Vacuum pump replacement | 1,800 | 6,500 |
| Hose and valve set replacement | 400 | 1,400 |
| PTO and driveline service | 500 | 2,200 |
How to Use This in a Negotiation
Stack the repairs the truck actually needs, then compare that total to the asking price. A unit priced $2,000 under the market but wearing a soft frame rail and a weeping vacuum pump is not a bargain. It is a $4,000-to-$10,000 commitment wearing a clean paint job.
- Cosmetic rust is cheap; structural rust is not. Surface scale on a crossmember is a wire-brush and paint job. Flaking, layered rust along the frame rail or at the spring hangers means section repair and fabrication labour.
- Pump seals are your early-warning signal. A weeping seal is a few hundred dollars if caught now; a scored shaft and failed pump can push you toward full replacement.
- Ask for invoices, not assurances. Recent tank cradle welding or PTO service with paperwork is worth real money at the negotiating table.
- Budget a contingency. Set aside 10-15% of the purchase price for the first six months of catch-up maintenance.
If the repair ranges line up with the asking price on paper, the truck is worth a proper inspection. To sanity-check what an honest septic tank truck cost looks like across tank sizes and vacuum pump types, compare the ranges above against current listings before you commit.
Frequently Asked Questions
How much chassis rust is acceptable on a used septic tank truck in Maryland?
Surface rust on frame rails, crossmembers and spring hangers is normal on any truck that has run Maryland winters, and light scaling that wipes off with a wire brush is generally acceptable. The problem is structural loss: flaking scale, pitting deeper than about 1/16 inch, delamination between frame plates, or rust bleeding through factory rivets and welds. Any thinning on the C-channel web, cracks near the rear tank saddle, or rust-through on the crossmember at the pump mount should be treated as a walk-away item. Probe suspect areas with an awl and photograph the frame before negotiating.
How can I tell a worn vacuum pump seal without dismantling the pump?
You can identify a worn seal from the vacuum retention test, the oil condition and external traces, without a teardown. A pump that pulls to its rated vacuum but drifts down quickly after shutoff usually has seal or vane wear letting air past the shaft. Check the pump oil for a milky or frothy appearance, which indicates moisture or air ingress, and look for dark streaks or drips at the shaft and bearing housing. Listen for a hiss or squeal near the seal area while the pump runs, and confirm the seal type (mechanical, lip or lantern ring) so you know what replacement costs.
What vacuum retention result is considered a pass?
A typical field pass is holding 20 inches of mercury (inHg) or better for 10 minutes with all valves closed and the tank outlet capped. Well-maintained pumps often hold 22 to 25 inHg, while readings that fall below 15 inHg, or bleed steadily toward zero, indicate seal, hose or tank leak problems. Because gauge calibration and tank size affect results slightly, always record the starting vacuum, the time and the ending reading rather than a single number. File the result with your septic pumping truck inspection notes so the seller knows the test was documented.
Does Maryland require specific permits to operate a septage hauling truck?
Yes, septage hauling in Maryland is regulated, and requirements depend on where you operate and where you dispose. You generally need a business licence, a Maryland Department of the Environment-approved septage hauler registration or permit, and an approved disposal or receiving facility agreement. County health departments may add local requirements, and trucks must meet weight, registration and safety inspection rules. Confirm current fees and forms with MDE and your county before purchase, since permits attach to the operator, not the truck.
Should I buy a used truck with fresh undercoating?
Treat fresh undercoating as a warning sign rather than a selling point, because it can hide active corrosion and poorly repaired frame damage. Ask when the coating was applied, request photos of the frame before application, and probe seams, rivet heads and the area above the rear axle where coating often flakes. If the seller cannot document the frame’s condition, budget for a third-party inspection or walk away. Legitimate sellers of used septic delivery trucks will not object to a mechanic scraping a small test patch.
What documentation should be in hand before paying a deposit?
Before any deposit, collect the title or lien release, current registration, and a photo of the VIN plate matching the frame stamp. Request service records for the vacuum pump, tank certification or inspection paperwork, and any DOT annual inspection reports. Get the bill of sale in writing with the exact price, deposit terms, refund conditions and a stated delivery date. Reviewing the true costs behind low advertised prices also protects you from surprise fees after the deposit clears.
Is it cheaper to rebuild a pump or replace it?
A rebuild is usually cheaper, typically covering seals, vanes, bearings and gaskets, and it makes sense when the housing and rotors are within tolerance. Replacement wins when the pump body is scored, cracked or obsolete, or when downtime costs more than the parts savings. Ask for a written rebuild quote listing every component, then compare it with a new or remanufactured pump price and expected service life. Confirm parts availability too, since some imported pumps carry lead times that can idle a truck for weeks.
Quick reference: inspection benchmarks
| Check | Acceptable | Reject |
|---|---|---|
| Frame rust | Light surface scale, no pitting | Flaking scale, rust through, cracks |
| Vacuum held (10 min) | 20 inHg or higher | Below 15 inHg or steady bleed |
| Pump oil | Clean, no froth | Milky, metallic or burnt |
| Paperwork | Title, VIN match, pump records | Missing title or lien release |
| Undercoating | Documented, older application | Fresh coat over unknown metal |
Use these thresholds as your baseline, and let an independent mechanic confirm anything borderline before money changes hands.
The Pre-Payment Checklist in One Place
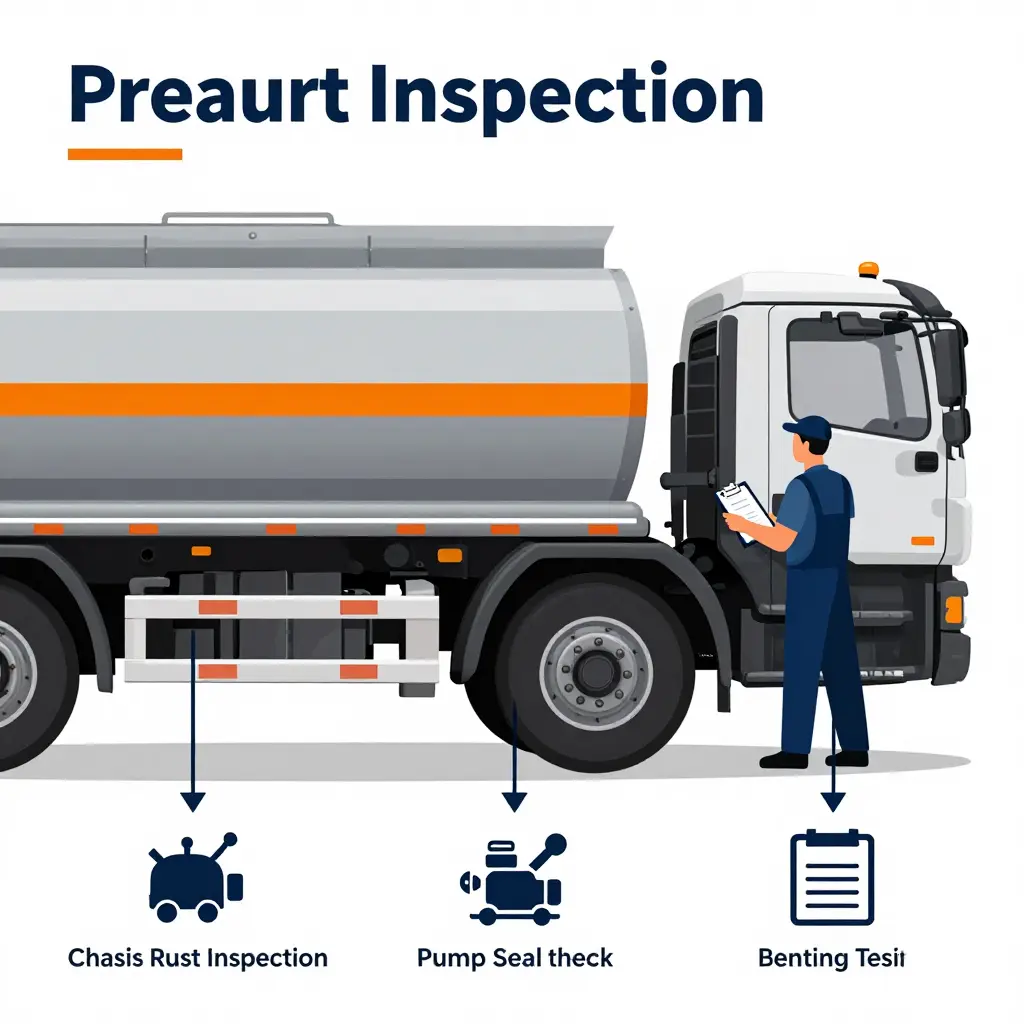
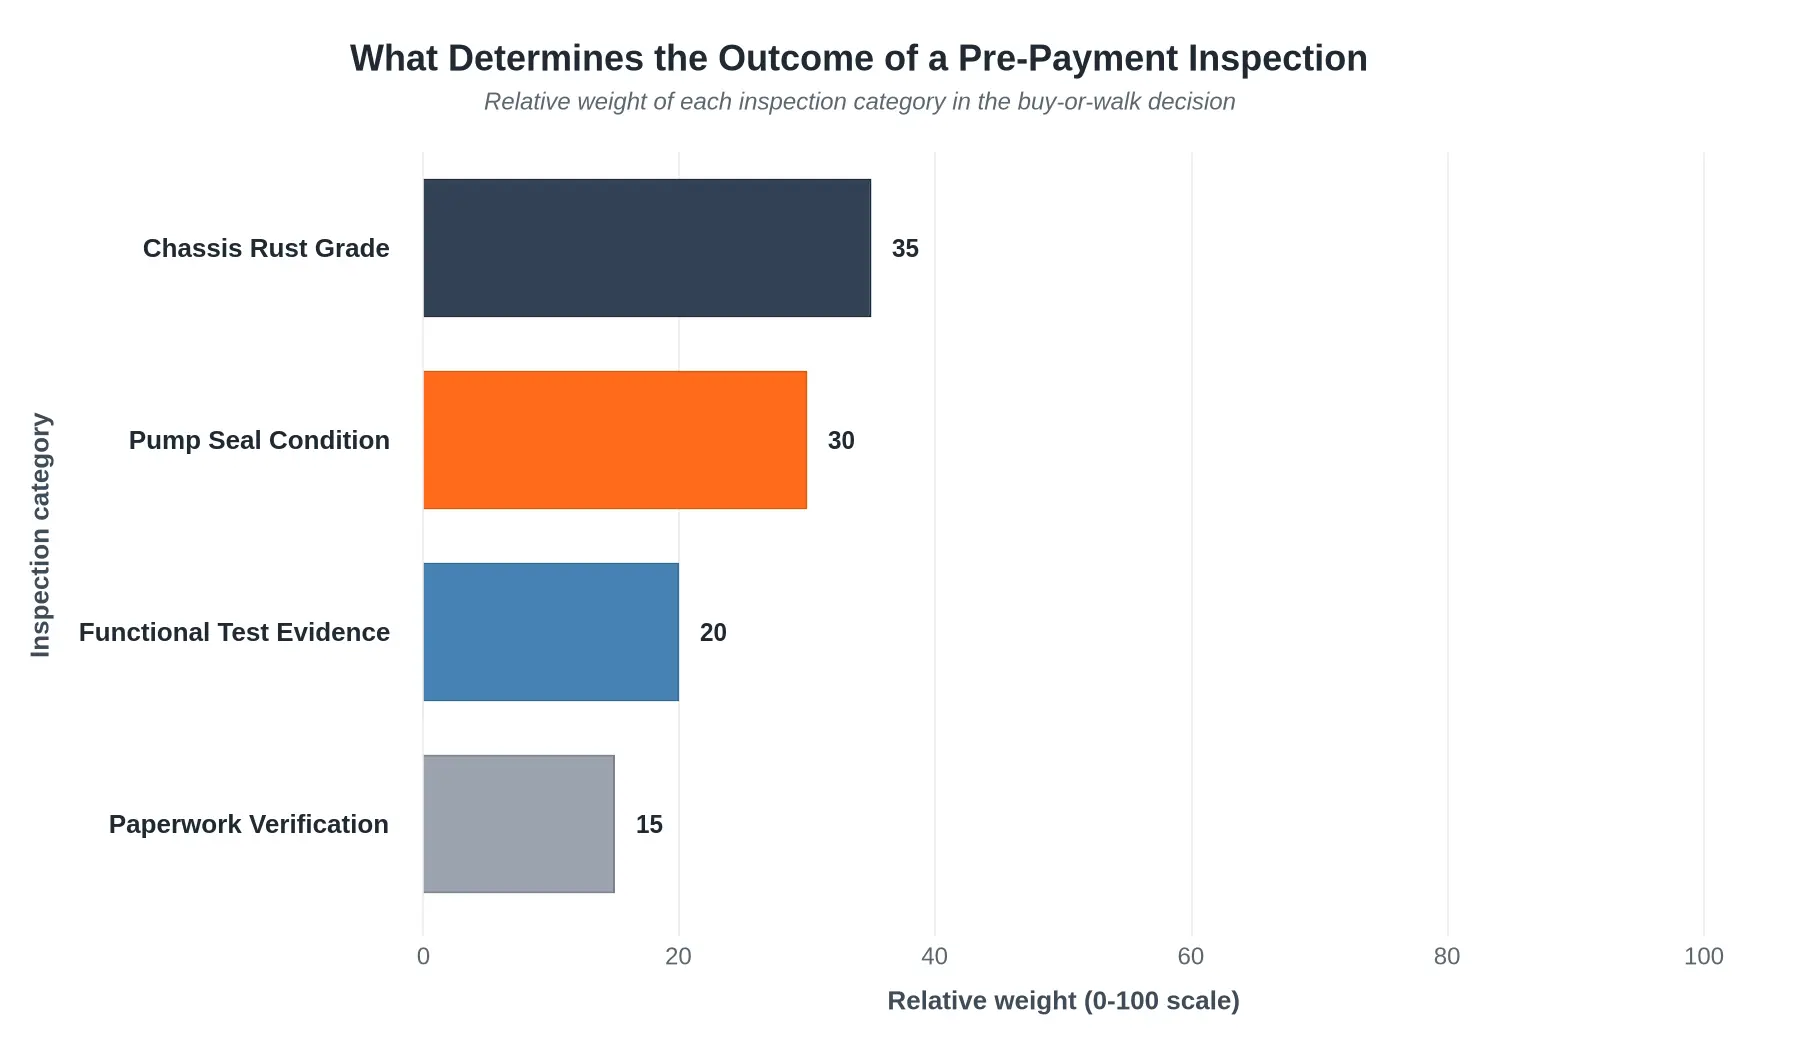
The decision logic behind buying a septic tank truck in Maryland is not complicated, and it should be applied in the same order every time. Rust grading establishes structural risk and, from that, the price adjustment you can defend. Seal condition establishes whether the truck can go to work on Monday morning or goes straight into the shop. Functional testing supplies the evidence that the first two judgments are correct rather than assumed. Paperwork confirms that the asset is legally and technically what the seller says it is: correct VIN, clear title, certified tank, and a service history consistent with the hours on the meter.
That hierarchy matters because each layer answers a different question. A chassis rust grade of light surface oxidation on a clean frame is a negotiating point; perforation at the crossmembers or tank cradle is a walk-away. Pump seal checks separate a truck that holds vacuum from one that will fail on the first wet load, which is the difference between a purchase and an unplanned repair invoice.
The Eight Checks Before Funds Leave Your Account
- Frame and crossmember condition – grade rust honestly, photograph it, and take thickness readings on the rails and gussets.
- Load-bearing zones – rear subframe, tank cradle, spring hangers and outriggers, where corrosion is usually worst.
- Pump seal integrity – inspect for weeping, check oil condition, and watch the seal area while the pump runs.
- Vacuum hold test – pull to rated vacuum, shut down, and measure how quickly it bleeds off.
- Tank shell and baffles – internal inspection for corrosion, weld condition and baffle attachment.
- Hose, valve and plumbing – discharge line, fittings and caps, checked for cracks and thread damage.
- PTO and driveline under load – engage the system and confirm it drives the pump without slip or noise.
- Paperwork verification – title, VIN match, tank certification, inspection records and maintenance history.
A documented inspection protects both sides of the transaction. It keeps the purchase price from being inflated by undisclosed condition, and it keeps the operating schedule from being broken by a failure that was visible all along. If you want to compare specifications and asking prices across dealer inventory first, review these septic tank delivery trucks for sale and see how low-price septic tank trucks often carry deferred repair costs into year one. Inspect first, price second, pay last.